ArleighBerg
Active member
- Joined
- Mar 27, 2012
- Messages
- 32
- Reaction score
- 0
This is a cross-post from Tamp & Puff so sorry for those of you who are on both forums.
First - I found a cool bent ball Viprati on eBay that I wanted badly. It went for more than I wanted to spend. I posted about this and Todd Harris chimed in and said he'd make me one. Hmmm. I thought before I have this pipe made, I want an idea of what it's like for size, etc. It's not like there are a lot of magnum sized ball pipes laying around to examine. So I decided to build a quick mockup out of pine to see how it was going to feel. I drew up a couple shapes in CAD to get an idea of actual size.
Some images
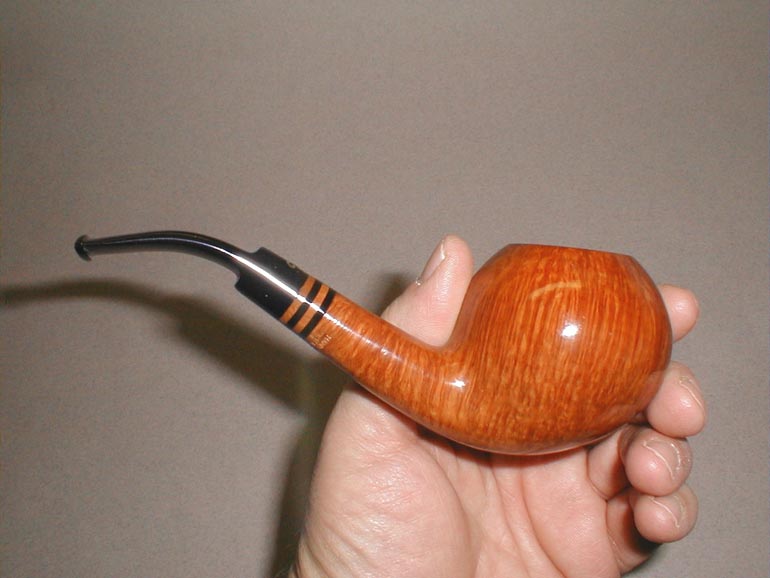
The initial Viprati
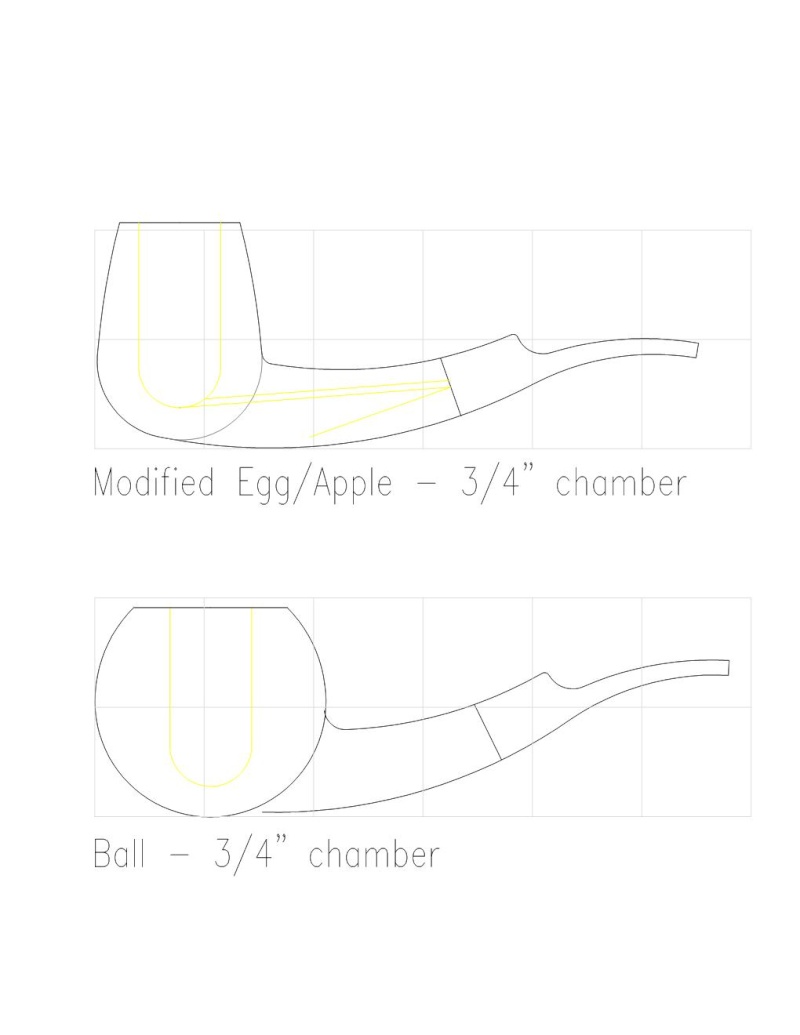
I also REALLY like Joao Reis' pipes, and am lovingly basing the shank and stem on a couple of his awesome bent egg designs. The CAD concept has his egg design as the top part of the image. I drew this CAD sketch to lay out the scale and proportions. The drawing shows approximately 5-1/2" long, 2" high, bowl diameter about 2-1/4" and we are going to try a 7/8" chamber. My mockup is this exact setup so we will see how I like that bowl size. I drew it with a 3/4" chamber but that is being changed.
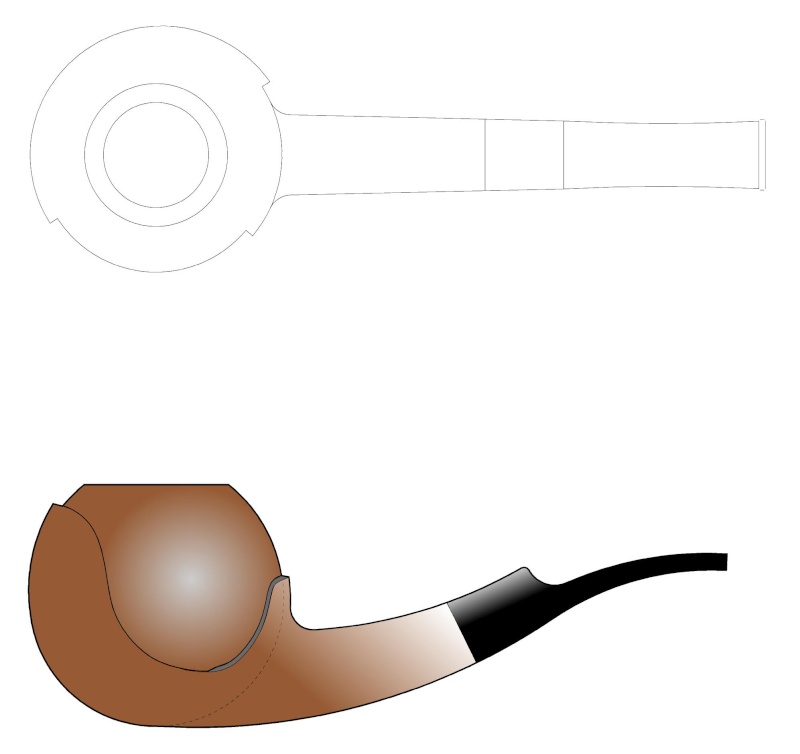
I tried a variation with a sort of "exposed ball within a skin" motif like some of the Danish makers. I still like this but it detracts from the elegance of the plain ball.
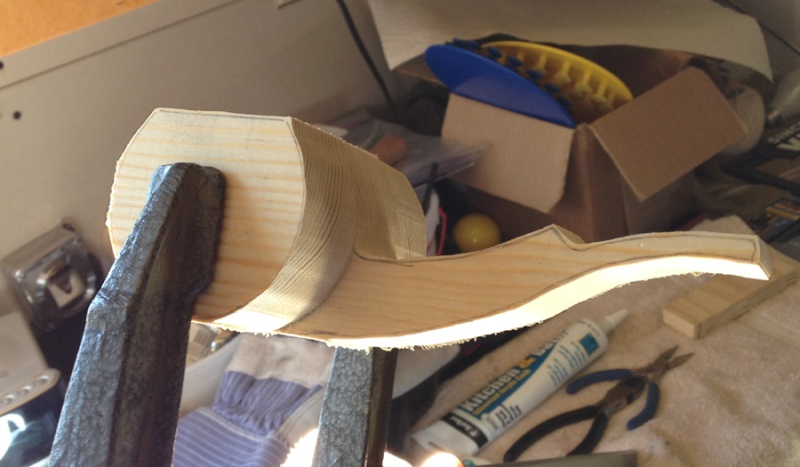
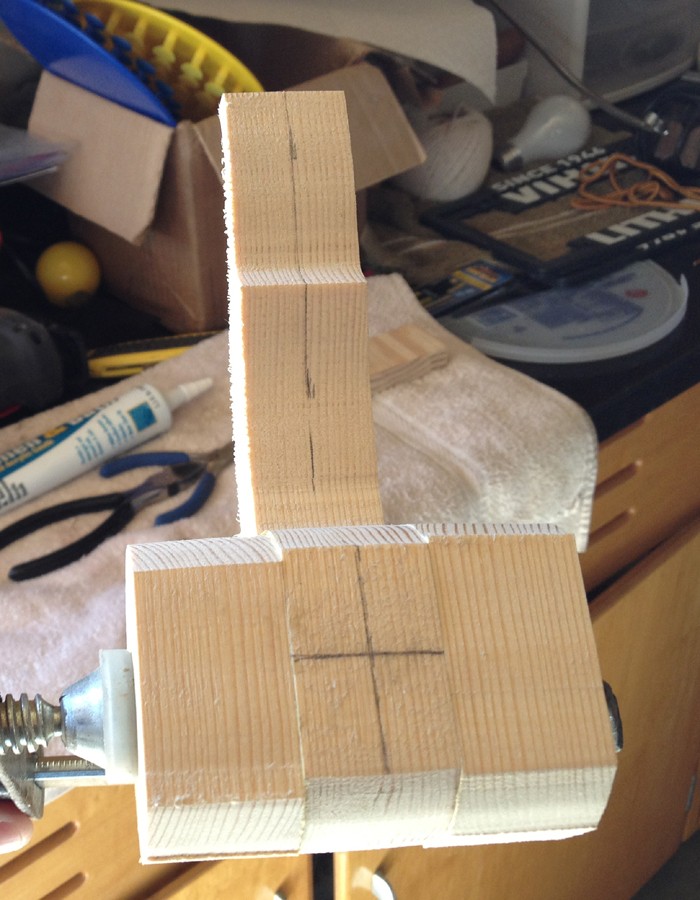
My wood chunk ready for shaping... I simply traced the side view onto a piece of scrap pine and glued a couple of extra chunks on the sides of the bowl to give it enough mass. I have to remove a fair amount of material now. My master assistant is my father, who is a very good woodcarver. I may have convinced him to try his hand at a pipe or two, so he might get a piece of briar for his birthday this year!
First round of shaping
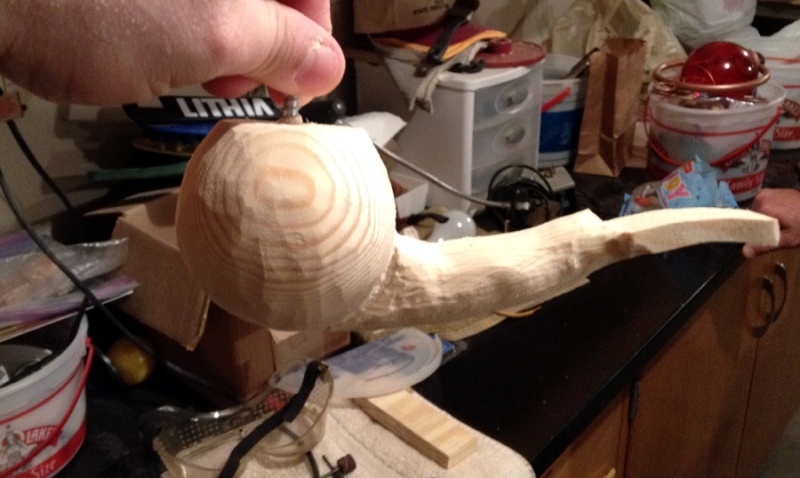
I had a chance to hit the power sander to do rough shaping. I had a little over an hour to spend and this is where I got. The perfectly round shape is a real challenge, as is trying to make the shank transition to the round stem. Now I will switch to hand sanding. It's technically completed enough to understand what this will feel like in hand. If you compare my photo of the pipe in hand to the Viprati, mine is only slightly larger. I will definitely be downsizing this a bit. It feels great in hand as an object to hold. Comfortable balance, etc. However it seems a little awkward in scale when I pretend to smoke it - just too large. This is exactly why the mockup was a smart idea. I love the shape an look, just smaller.
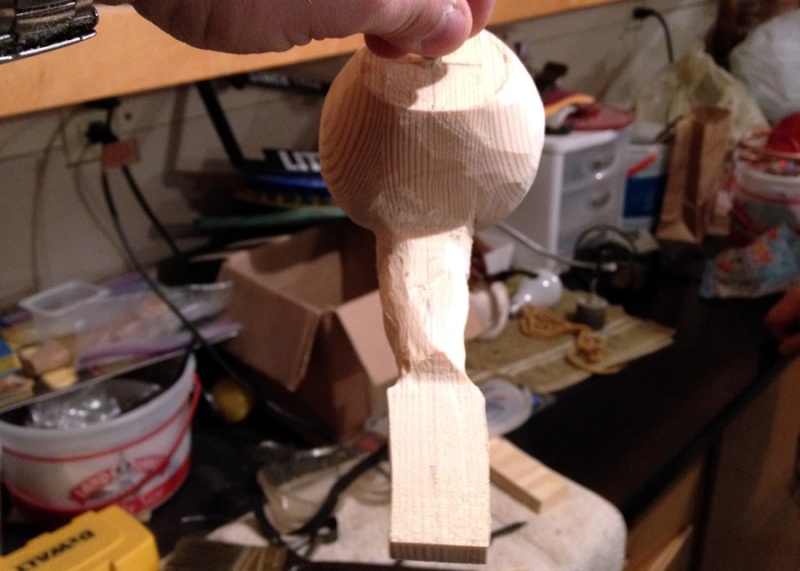
Dad wants to finish the mockup as a carving project - smooth sanded, stained, drill the chamber, black high gloss lacquer on the stem, etc. The first image is taken a little off center so it makes the shank and stem look funny - it is really pretty well balanced in terms of being aligned and square.
UPDATE
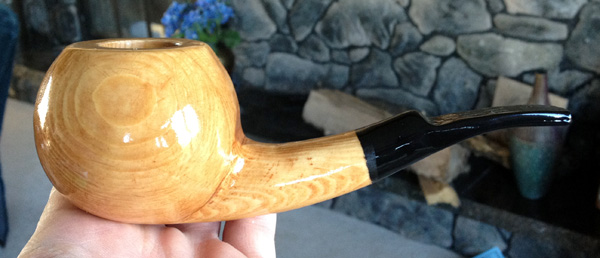
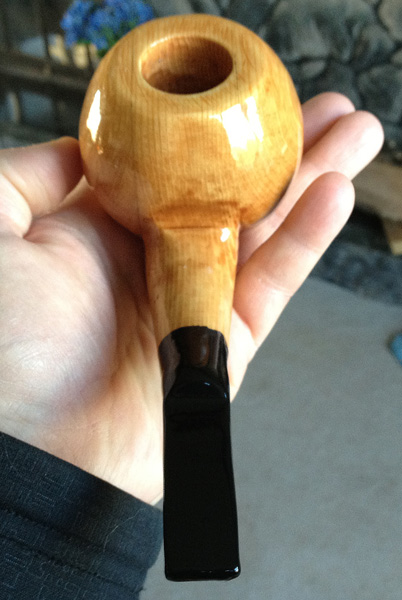
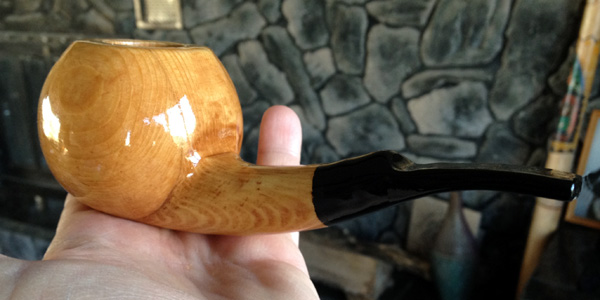
It's been a couple of weeks since the last images of my mockup were posted. Since then I have slowed down and concentrated on finishing. I am not a woodcarver, not do I have any experience in finishing. What I've done is limited to a few dozen board feet of wall base trim and such when fiddling around the house. So this was totally new to me.
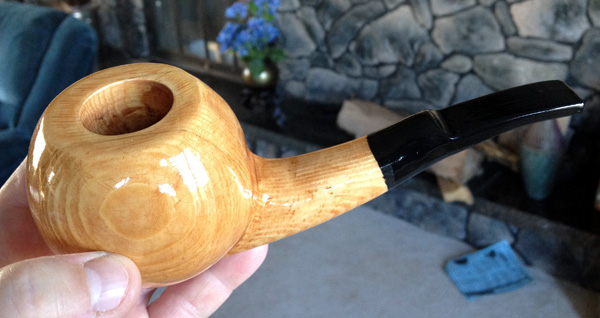
The last we left the mockup it was pretty raw looking pine, but enough to get a real feel for the size and shape of a finished pipe. Technically this is all I intended to do before having Todd start making the real one. However, as I lived with the mockup, I decided to actually finish it and keep it as a decoration. I spent some time sanding and smoothing, and trying hard to make the ball be symmetrical. I have to say - I totally respect pipe carvers for being able to maintain symmetry, and anyone who can carve a true ball is a master in my book. It is very difficult to keep that round shape in all dimensions, as I found out. I did pretty good but ultimately settled for less than perfect. I also didn't try to make the smoothness and grain be perfect either. It wasn't worth it for a cruddy pine carving. If I would have used a good hardwood I not only would have tried harder but I may have considered trying to drill it and use it.
After seeing a few of your individual first carving projects I feel a bit inferior but at least it gave me a good taste of what the shaping process is like. I might just try my hand at a real one now. Bring on the briar!
First - I found a cool bent ball Viprati on eBay that I wanted badly. It went for more than I wanted to spend. I posted about this and Todd Harris chimed in and said he'd make me one. Hmmm. I thought before I have this pipe made, I want an idea of what it's like for size, etc. It's not like there are a lot of magnum sized ball pipes laying around to examine. So I decided to build a quick mockup out of pine to see how it was going to feel. I drew up a couple shapes in CAD to get an idea of actual size.
Some images
The initial Viprati
I also REALLY like Joao Reis' pipes, and am lovingly basing the shank and stem on a couple of his awesome bent egg designs. The CAD concept has his egg design as the top part of the image. I drew this CAD sketch to lay out the scale and proportions. The drawing shows approximately 5-1/2" long, 2" high, bowl diameter about 2-1/4" and we are going to try a 7/8" chamber. My mockup is this exact setup so we will see how I like that bowl size. I drew it with a 3/4" chamber but that is being changed.
I tried a variation with a sort of "exposed ball within a skin" motif like some of the Danish makers. I still like this but it detracts from the elegance of the plain ball.
My wood chunk ready for shaping... I simply traced the side view onto a piece of scrap pine and glued a couple of extra chunks on the sides of the bowl to give it enough mass. I have to remove a fair amount of material now. My master assistant is my father, who is a very good woodcarver. I may have convinced him to try his hand at a pipe or two, so he might get a piece of briar for his birthday this year!
First round of shaping
I had a chance to hit the power sander to do rough shaping. I had a little over an hour to spend and this is where I got. The perfectly round shape is a real challenge, as is trying to make the shank transition to the round stem. Now I will switch to hand sanding. It's technically completed enough to understand what this will feel like in hand. If you compare my photo of the pipe in hand to the Viprati, mine is only slightly larger. I will definitely be downsizing this a bit. It feels great in hand as an object to hold. Comfortable balance, etc. However it seems a little awkward in scale when I pretend to smoke it - just too large. This is exactly why the mockup was a smart idea. I love the shape an look, just smaller.
Dad wants to finish the mockup as a carving project - smooth sanded, stained, drill the chamber, black high gloss lacquer on the stem, etc. The first image is taken a little off center so it makes the shank and stem look funny - it is really pretty well balanced in terms of being aligned and square.
UPDATE
It's been a couple of weeks since the last images of my mockup were posted. Since then I have slowed down and concentrated on finishing. I am not a woodcarver, not do I have any experience in finishing. What I've done is limited to a few dozen board feet of wall base trim and such when fiddling around the house. So this was totally new to me.
The last we left the mockup it was pretty raw looking pine, but enough to get a real feel for the size and shape of a finished pipe. Technically this is all I intended to do before having Todd start making the real one. However, as I lived with the mockup, I decided to actually finish it and keep it as a decoration. I spent some time sanding and smoothing, and trying hard to make the ball be symmetrical. I have to say - I totally respect pipe carvers for being able to maintain symmetry, and anyone who can carve a true ball is a master in my book. It is very difficult to keep that round shape in all dimensions, as I found out. I did pretty good but ultimately settled for less than perfect. I also didn't try to make the smoothness and grain be perfect either. It wasn't worth it for a cruddy pine carving. If I would have used a good hardwood I not only would have tried harder but I may have considered trying to drill it and use it.
After seeing a few of your individual first carving projects I feel a bit inferior but at least it gave me a good taste of what the shaping process is like. I might just try my hand at a real one now. Bring on the briar!
")