Ninja Stand Project w Damascus Tamper

Brothers of Briar

Help Support Brothers of Briar:

This site may earn a commission from merchant affiliate links, including eBay, Amazon, and others.

Blackhorse

Trading Post Moderator
Staff member
Moderator
B of B Supporter
Council Member
Joined
Oct 23, 2010
Messages
13,280
Reaction score
1,877
Location
Oregon City, Oregon - USA
It took a few days to get this one done, but generally went pretty quickly with no issues. Now THAT'S gotta be a first!

The rack is made of Oak, the 'feet', made from Cherry dowling. Indents in which the pipes sit were carved with a medium sized gouge. Although the color temps in the pics are a little misleading, the stain is black semi-transparent and many of the borders and places were two pieces of wood meet were darkened with wax and/or watercolor based colored pencil (which I use quite a lot). Following a good drying time, it was re-rubbed lightly with 0000 steel wool prior to a final sealing with 3 coats of spar urathane spray.

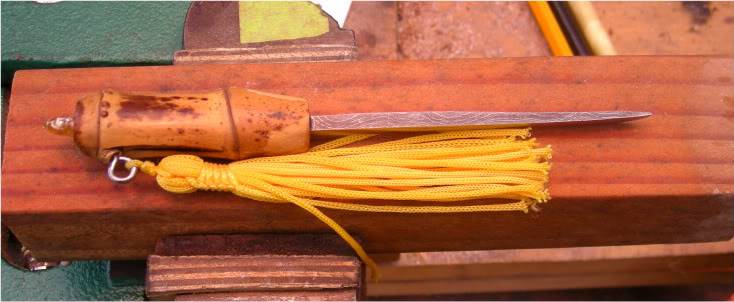
The 'Tamper' is obviously a Ninja sword theme (a Samurai sword would have had the arced Katana shape) and is made from a good piece of Damascus steel...left raw on top and bottom and with a high polish on the sides. The tamper handle is Black Bamboo from a friends property locally (there are no scraps that I will not scrounge). The butt of the tamper holds an agate, set to project out sideways...looks cool with a light source behind it. In one photo below, the tamper is shown inserted into it's 'home' which is a square channel cut down into the back board.

The round icon is Briar...and the Japanese 'lettering' stands for 'Bamboo'. Again...carving tools (quite small ones) were used to incise the calligraphy into the Briar and then red pigment was added into the channels of the writing.

One thing I do extensively is use 'found' and scrap pieces in these projects. Every piece of the piperest and the tamper thing are of that type. The agate was found near Yachats (pronounced 'Yaw-hots") on the Oregon coast and were 'tumbled' in a vibrating polisher I use frequently.

Fun project. BTW: the two pipes were purchased as a set of two. They look right at home, I'm thinkin'.


NewYork073-1.jpg


NewYork068-1.jpg


NewYork075-1.jpg
 
Absolutely Awesome. Those pipes have found quite a home!
 
The stand is very nice, the tamper is gorgeous, and the pipes tie it all together magnificently. Good show!!!!
 
Very cool stand, I like how it ties in perfectly with the pipes. Great idea.
 
I carve many walking sticks and canes in nicer weather...people notice them, they tell their friends, they sell. What makes them unique is the often strange, even bizzarre designs...I use side branches as noses for characature faces, etc. And each one has a theme. I was once asked to do a presentation to a wood carving club and 40 members showed up for it! They wanted to know two things: first...where did I get my IDEAS, second...how did I color them?? I told them quite frankly, "If ONLY I could stop the ideas!" They looked at me like I was daft. I guess they must sit there and look at a piece of wood and just be blank. It's a matter of either loving it, each and every little step and activity of making it...and having it be a part of what you think about all the time...how this could work or how that might be better...you know, investing yourself in it. Making sticks, canes, the occasional wood sword (like a bokken), pipes, pipe furniture, knives, scabbards is what I do at least 6 hours a day, every day, almost without exception. As well, I have very few power tools and do most everything by hand...lots of sore muscles. lol

The point of all this is that yes, you do need to be deft with the making...well cut, well sanded, finely finished, etc. But if there's no 'idea' that makes it unique or interesting...then it's just another piece of furniture that took too long and too much effort to make.

This is the second rack I've made...no plans or design other than a pencil and a ruler. Next time I think I've wider the center gap, making room for wider pipes and do three tools sitting in the back thing.

PS: Under the bottom, it has a green felt applied, just to make it more finished.
 
Blackhorse, you're a multi-talented mothereffer. Jeez. :shock: I have a neat collection of Japanese wares and decor, and that would fit in nicely in Chateau Weiss.

A couple of Tsuge bamboo pipes would be even more apropos.

Nice job. 8)
 
Your "tamper" is the most intrigueing thing about the whole "unit" ! First: How do you "tamp" with it? and second: Can you show us the tools you used to make the Damascus "blade" ? They must be tiny :p
 
monbla asked:
First: How do you "tamp" with it? and second: Can you show us the tools you used to make the Damascus "blade" ?
First: ask Mr. Weiss re: how to tamp with the narrow tamper. I got the idea from him, actually...and it works very well. You just push with the pointy end of the sword and depress the top of your bowl's load. It allows a selective approach as opposed to squashing the entire top and keeps the top more 'open' so that it doesn't form a plugged top...better breathing and control.

Second: the tools? First, there's a one inch 'tang' on the blade that fits into the bamboo. I have a very nice vice that rotates 360 degrees...the head also comes off its base and you can move it 90 degrees either way and drop it back onto the 'post' - so it allows an almost infinite variation of positions. I crank the 'sword' into the leather padded vice and go to work with a variety of files starting with a large double cut bastard file and working down through various 'cuts' til I get to a pointed half-round #6...quite fine. The a fresh 400 grit paper, then 600 and 800 grit and finally 0000 steel wool. For other work I also use 1200 and up to a 4000 grit paper! Then a 6" cotton wheel loaded with white rouge. That puts a mild mirror polish on it. I could do one finer compound, but with a working piece like this, it's pointless as it would soon just revert back to the finish that the white rouge provides.

I do have three sets of different needle files, Swiss cut, in #2 and #4 cuts...half-round. Also two sizes of riffling files (shaped ends) in a wide variety of shapes one set being very coarse more for wood and plastics, etc. and a fine cut for metals. Some are shapes that are not available any longer - which I've had for over 40 years!

In addition I have a trusty Dremel with a flexible shaft and keyless chuck for which I have a huge variety of stone and drum wheels as well as felt buffing wheels that I have set up for 4 diffrerent buffing compounds - AND - several tins (old metal Zippo tins) with quite a large assortment of high speed steel and diamond tips in various shapes (I have agenerous Dentist that gives me his old bits).

The power tools I use are the Dremel, a very nice DeWalt compact cordless drill (couldn't live without it). For Christmas this year I snagged a new 2X42 belt sander that is just coming into play. And avariety of hacksaw frames and blades, etc., etc., etc. That's the metal working setup. If you take the wood side of the projects into account you can add a WHOLE lot of Japanese pull saws, chisels, carving gouges and the like in every size you can imagine, Sweedish draw knives, some totally cool Iwasaki carving files (that cut instead of abrading) and again...etc., etc., etc. Many are of course 'cross media' in application. This doesn't count the tools that I made myself.

OH YEAH! And for the initial grinding on larger knives to get the bevel contours into rough shape I just this year picked up a small Bosch 4" angle grinder.

LOL - well, you asked for it! :lol:
 
this is one cool stand ... like it... :)
good job...!!! :)
regards
daniel
 
Blackhorse":ekcj1qbo said:
I really appreciate all the kind words guys. Thanks very much.

Daniel...expecially from a Master like yourself...high praise indeed!
i mean what i said... good job :)
regards
 
Blackhorse":1ohcmbtg said:
monbla asked:
First: How do you "tamp" with it? and second: Can you show us the tools you used to make the Damascus "blade" ?
First: ask Mr. Weiss re: how to tamp with the narrow tamper. I got the idea from him, actually...and it works very well. You just push with the pointy end of the sword and depress the top of your bowl's load. It allows a selective approach as opposed to squashing the entire top and keeps the top more 'open' so that it doesn't form a plugged top...better breathing and control.
This...


(....makes no sense... :lol: )


8)
 
Top