A Tinsky Pipe Kit

Brothers of Briar

Help Support Brothers of Briar:

This site may earn a commission from merchant affiliate links, including eBay, Amazon, and others.
FINALLY...MORE PICTURES...

Some of these sort of speak for themselves - or - illustrate things I've already talked about, so I won't go into more blabber.

Before the pictures I want to add that following any of the prior posts describing what I've completed, and following the pictures below, I've gone through further finishing via filing and sanding. Filing (and you can see a few of the files I used in one of the photos here) was done using successive sizes and cuts of riffling files...followed by sanding starting with a 220 grit, going through 320, 400 and ending up this afternoon with 600. I still have one stage to go which will be with a 1200 grit. But before that takes place I need to go back and re-file a few areas that I've judged still need so refinement.

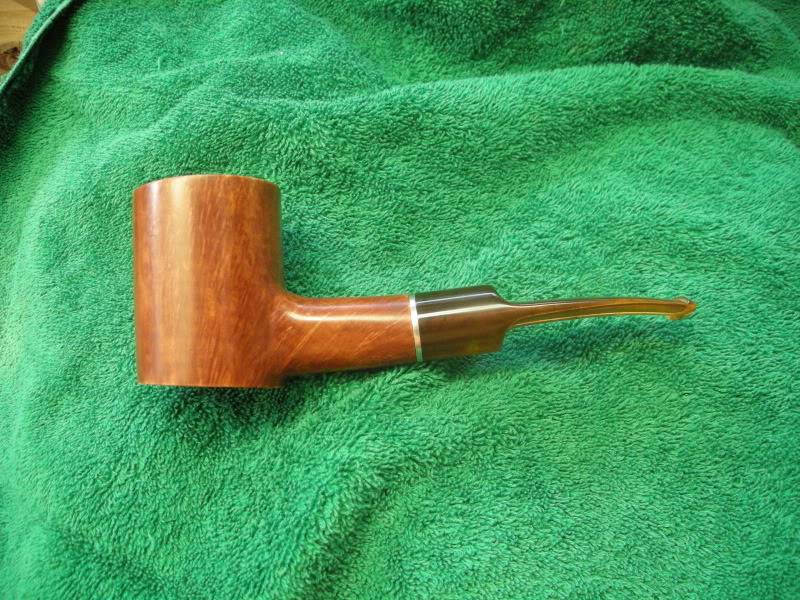
Also, the slight gap visible where the stem meets the shank never did just 'go away'. The face of the shank where it is supposed to meet the stem face and be totally flush had perhaps 1/8 of the diameter 'gap'. You can see this in the photos easily, I think. In the end I had to sand the shank face back...and never could get it to be as completely flush as it should be...resulting in a disappointing fit. I'm not sure what to do to correct this.

Edited comment: In the end I sanded that face of the shank to a fairly regular and smooth surface, removing the area in question. This required that I 're-chamfer' or 're-countersink' the bore at the face of the shank as the sanding removed most of this.

I'll add a few further photos of the pipe in its current state of having been sanded 95% to completion. Then I'll get into the end game...staining. Not sure at this point whether I'll use a leather dye or another product like Trans-Tint or dip into my existing stock of water based stain that I've used before...a Birchwood Casey product. So - stay tuned for that.

And now...the pics:

DSCN0554.jpg


DSCN0557.jpg


DSCN0561.jpg


DSCN0562.jpg


DSCN0567-1.jpg


DSCN0571-1.jpg


DSCN0572.jpg


DSCN0574.jpg


Last process comment...you can see that I used some electrical tape to wrap the end of the stem...just for protection. As I sanded down to close to the final dimension it came off and eventually at the 600 grit stage the end of the stem and the briar shank were sanded 'jointly' to get the final surface to be the same diameter. It seems to have worked pretty well.

Thanks for watching and sharing your thoughts and for your patience. TTFN
 
I've been enjoying your narrative on this project, and your progress. It's looking good, I'm eager to see the finished pipe. Have you decided what finish you are going to use and if you are going to use some stain for contrast? Oh, about your gap, it can be a pain to level the joint as you well know. Sometimes I use spacer material from knifemaking. It's a vulcanized substance that is fairly rigid, but has a bit of give to it. I have some red, grey, white, and black. If you'd like, I can send some in your direction.
 
Your idea of a spacer is something I've thought of doing as well. I had considered using either brass, copper or coin silver, or a sandwhich combination. ..any of which I could to fairly well I think...the brass from washer material at the local hardware store, the copper or silver from a burgeoning coin collection I've hoarded over the years. The collection started with my father's hoard of French, Italian and Nazi coins he brought back from Europe in 1946. But that would require shaping a slight cone on the strummel end of the spacer (which in reality would be easier than producing a truely flat shank face), whereas your material might allow it's 'give' to absorb the flaw - so to speak. Yes, I'd love to have a bit of the material with which to experiment. PM pending...now sent.

Re: the staining...yes I will, unsure as to what product as yet. A friend is also working on his own pipe project at the moment and wants to do a contrast stain...doing a dark stain first, sanding that down to reveal the grain, which leaves the background dark and removes the stain from the grain...and then going in with a second coat of lighter stain so as to allow more highlights of the grain than a single application would provide.

One thing I really haven't commented on to this point is the grain pattern in the piece of briar Mark sent. As you might be able to tell from a few of the photos, I think there is the potential with this piece to show an exceptionally nice grain, when complete. So, even though I may not go to a double stain application I'll do what I can to allow that to be seen to it's best advantage.
 
Call me cheap, but I do quite a bit of leather work and since the dyes are alcohol based, I use them. However, word to the wise, pink does not work well, though any darker stain covers one's mistake. Something you might try if you have a delicate touch is to take a very thin brush and stain the some of the individual grains with brown, some with black. There are some larger grains in that piece of wood that should be excellent targets, and then do your contrast. I like the thought that you are sort of whiskering the briar with the stain, but I wonder how heath would react to a true whiskering. Any of our professional carvers have any insight on that thought?

 
Interesting ideas...but it's too late for that now. After my adult son and I got back from taking in 'Drive' at one of the local movie joints, I went back out and re-worked the strummel with 600 grit...several times to ensure complete coverage...and then a rather quick but aggressive attack with 1200 grit. Put a nice sheen on the briar with THAT for sure! Then I flooded the thing royally with my trustworthy Birchwood Casey Maple Stain...intended for gunstocks (and once used by me for the stock of a 50 cal. Hawken I put together). I've used it on several prior pipe projects with good results...and if all else works out well it should be excellent, as the coloring (at least to my limited aesthetic sensibilities) is a super match to the tortois stem that's now undergone 3 successive polishing levels and is looking fine indeed. Even though I've had my times of hope and confidence crumbling to despair..I'm back to the belief that tghis one will turn out pretty OK. What's left is either a sanding and staining with a lighter color (a golden hue would be pretty cool I'm thinking) or maybe just some 0000 Steel Wool and the final polishing. We'll see.

Photos have been taken of all the stages mentioned and just need uploading and posting. Likely that'll occur tomorrow.

TTFN
 
So - I've got picutres up and on the host server so I'll download them now and add a few comments after I get back from taking my daughter to school.

Here they are...coming along OK:

These first three just show both sides and a 'bottom shot' at the 600 grit sanding level. That one face has particularly nice graining.

DSCN0592.jpg


DSCN0593.jpg


DSCN0594.jpg


Now things start to get interesting. In order to counter the slight gapping caused by what I thought was my sanding, I'm making a spacer that either might or might not help. The metal disc shown on the stem is a 1935 10 centime piece...French. Don't worry, it's not worth any collector value. It's certainly not coin silver...not nickle...thinking it might be nickly silver...it has that look. Whatever.

DSCN0597.jpg


Having discovered that the spacer along wouldn't do anything to the gapping...even after having filed a countersink shape around the center hole and slightly dishing out the offending side to give further clearance to the face...I actually looked at the face of the stem iteself. AH HAAAA! The stem face has a very slight platform shape the makes the rim gap. So here you can see my handy dandy DeWalt mini lathe. (lol) I fudge up things like this all the time...whatever works I always say. I took a drill bit slightly smaller that the bore hole, wrapped it with some slightly stiff paper and wound the stem onto the bit so it was moderatley tight. Then, running the drill at a very low speed so that the enevitable wobble was manageable I used a pretty fine riffling file and a sanding stick to remove the stock on the face of the stem so that it was flush.

DSCN0599.jpg


The resulting band and fit, prior to stem polishing.

DSCN0605.jpg


And after a little work with a few successive grits of polish.

DSCN0610.jpg


The strummel following a session of sanding with 1200 grit paper.

DSCN0611.jpg


The strummel after the application of the stain. Ends up by being a nice match to the tortoise color of the stem. Note the little chunk of briar just beneath the strummel. ALWAYS save pieces of your briar to use as test pieces for stain, and anything else that might need testing...prior to final application. Last note: on the directions for the stain it noted that the product was a concentrate and that it MUST be mixed 50:50 with water (or denatured alcohol). I promptly ignored this caution and tested and then applied it full strength...multiple coats...in repaid succession...not waiting for drying. I wanted to really flood the surface with pigment, hoping a fair amount would penetrate. At this point anyway, it has the effect I was hoping for. The end result will be lighter and a little more red that the image looks at least on my screen. That should be fine...but we'll see.

DSCN0622.jpg


Next comes a light sanding to see what kind of resolution I can get out of the grain without going to a dual stain. If the coloring is where I want it to be...I'll just refine the surface with 1200 grit and then start the final finishing.
 
Well shoot me in the foot, I forgot I have some nickel silver sheet and bar stock. Maybe next time.

That is going to be one beautiful tobacco killer. The grain is fantastic, and it's giving me a bad case of SAD (stummel acquisition disorder). Tinsky really did a fantastic job providing you the perfect piece of wood for the project.
 
That is one real nice Stummel BH...realy real nice, and I like the stain as well.
 
Mr. Tinsky is indeed a master...of provision as well as fabrication. I think I'll be most pleased with the result. Now all I gotta do is unearth my stash of 1200 grit paper. And I know I've got an even finer paper somewhere in this place. There are parts of my storage areas that kind of have the feel of those places they show on the "Hoarders" programs on TV. lol

I've read up on several sites, the one that is linked to via the Pipedia site and the Downey site as well, regarding polishing and what to use and how to do it and all. It seems that Downey has some secret formula that uses Carnuba (what I intended) but also adds another ingredient(s) to get the final finish. He states that the carnuba is a short-lived application that needs constant redoing to keep up. Well, I know that's true as I'm always buffing a pipe or two with a little more to achieve a nice finish on working pipes. What the other is, without being petrolium based of course, I have no idea. If anyone out there has any cogent ideas, I'm all ears.

Slice of Life Sidebar:

On the way back from taking my girl to school I passed a large wooden spool...the kind they use when they're redoing phone or electrical lines. When they're done with the spool the trucks just leave them. The thing has been sitting along side of the road for about a week. So I pulled in to a parking right next to it where the folks that worked in the adjacent building weren't at work yet and proceeded to roll the spool over to my station wagon (an '02 Taurus we semi-affectionaltely call 'the Family Truckster' after the Griswald's beast) and got out a number of straps and tethers from the well beneath the back deck. As I was surveying the situation and realizing that the damn thing was REALLY heavy, some stranger on his way to work pulled in behind me and offered to help lift it onto the rack! Amazing show of Sameritanism I gotta say. So up it went and down it was strapped and off I went. Just then I noticing an Electric Company truck sitting across the street with the parking lights on, idling. Hmmm. Now, items left by the roadside in this state are considered 'public property' and free for the taking...including downed and trimmed wood from trees and the like. But at that point I became a little unsure as to the legality of what I was doing. As I edged up out of the lot and had my nose just to the street the truck started pulling forward. But events being at the stage they were, I just slowly pulled out into the street and went on my merry way. The truck did pull out and went the same direction I was headed, a few cars back, but turned off at the next street. So unless he wrote down my plate number and plans to phone it in to the local constabulary I'll be OK. Maybe I'll get a call or a visit by Officer Krubkey later...hope not. I have another of those spools that I snagged in the same way about 3 or 4 years ago that's even larger and it's been a great deck table and workbench thing for good weather. When my 24 year-old son wakes up I'll get him to help me unload it from the top of the car and then I can roll it around to our deck and into the back yard. It'll be a nice addition to the eclectic assortment of 'furnishings' to the old stable here once I add a coat of stain and all. And so it goes.
 
Indeed...as always...and on so many levels! And to show you how very true it really is, I'll upload and post a shot of my latest acquisition...a stunning Boswell Poker that I'm thinkin' of callin' either Big Dog or Blackdog! Not only does it smoke a 'big load' like a dream, it has...'the look'...a stunning pearlescent graphite lucite stem, a majorly oversized bowl and a rustication that's sharply cut with the background a matte black but the high points are polished to a super gleaming shine. I got it from a friend who unfortunately knew how much I liked it...and traded away two very nice items from my shrinking collection (that I'll admit I just never reached for) so I guess that was OK.

Therefore...I'll end up with two (ahem) Big Pokers...the black rusticated with the black pearl stem...and 'my' smooth briar with the tortoise stem. I guess I really DO like 'em in pairs.
 
So for those suffering from slathering lustfull cravings for 'new wood' - here's a few shots of my other new mega Poker: A 2011 Boswell Black Beauty Beasty Boy. The stem on this is a pearlized lucite that goes from black pearl to a kind of graphite into black...very, very good match for the matte/gloss black of the wood. I think the pair of these Pokers will make great bookends.

DSCN0584-1.jpg


DSCN0581-1.jpg


DSCN0587.jpg


The size of these two Pokers leads to an interesting outcome. The bowl configuration, while being within a normal range for most pipes, ends up being quite...most likely similar to a 'chimney'. After a number of bowls in this and other tall and narrow bowls I've come to have a new respect for this design. For one thing it allows a very long 'second half' of the smoking experience...during which most of the darker flavors that I enjoy come out to play. Another pipe that has this bowl configuration is the Freehand Miss. Meer. (and the General I guess). It's coming to be one of the bowl designs that I appreciate the most.
 
And here we are...essentially a completed kit pipe. This shows what will likely be the final item.

In terms of dimensions the pipe is 6 1/2" overall length, it's 2 3/8" in height with the bowl being 1 3/4" in diameter. The bowl has in inside diameter of 13/16" and a depth of 1 7/8". In relation to the black pipe shown in prior pictures? That one is 6 3/8" long, 2 5/8" tall, has a bowl diameter that's 1/16" greater and a 7/8" bore. The shank on mine is located lower on the bowl and has a slightly larger diameter. In other words, the two pipes are very similar in terms of size, but differ slightly regarding design (aside from the surface treatment). Both are big pipes.

Prior to these photos being taken I went over the bowl area with a magnifying device and discovered 4-5 spots that really do need to be resurfaced. I noted small sanding or file marks that I didn't see prior to going from one grit to the next finest...at whatever point along the way. I will likely resand the entire strummel and go back through the necessary stages to sanding and buffing and dying and then polishing to get back to the point shown - but with a completely smooth surface...the was it should have been done in the first place.

Also - you will note that the stem has undergone a slight bending. Proceedure used follows: 1) Heat oven to 270 F. 2) Put a layer of table salt into on oven save pie plate. 3) Put the stem (with a thick pipe cleaner inserted into the bore to prevent it from collapse) onto the bed of salt and cover with more salt. 4) Put the pie tin (actually glass) in the oven and wet timer for 10 min. 5) Take the stuff out and with oven proof pads, etc. take the stem and slowly, with gentle pressure, attempt to bend it. 6) When the stem will bend using gentle pressure, bend to desired amount and either hold til cool or while holding it in the desired shape hold it under cold running water til cool. This worked great. But it took more than the 10 minutes. I re-buried the stem in the salt and put the thing back in the oven for 3 min. a total of three times. Still no bending. I then set the stem on top of the salt instea of burying it and returned it to the oven for 3 min, again no bending. I did this last proceedure a total of 3 times and finally the stem yielded to my careful bending.

I just wanted to put a slight bend in the end to compliment a very, very slight upsweep in the contour of the top of the shank that I had left there. I could have created the shank with the traditional stovepipe, straight sided form. But after working on it for a while I kind of liked the curve and decided to leave it in - I could always remove it in favor of the straight contour. I'm glad I left it in. I think it adds a unique dimension that doing a kit like this allows. It makes it a little different from the standard, which is OK. So even though I'll likely go back and do the resanding to remove the few little scratches that I found, the upsweep on the top of the shank will stay. So the end form will have the shank's top with an ever so slight downsweep from the side of the bowl to meet the nickle silver spacer and then the stem will retain it's slight downward bend. I like it!

Here's the pipe:

DSCN0658-1.jpg


DSCN0656.jpg


DSCN0664.jpg


I'll only come back in here to post additional photos if there are changes to the general character of the pipe that occur through further work. If not, that's it!

Also, if anyone has any questions about how or why I did a certain thing...re: design decisions, tools used, process stuff and the like, I'll certainly do my best to address them.

Again, special thanks to Mark for a fantastic kit, as well as to those that added their comments along the way.

So I'm outta here guys...so long for now.


OH! BTW: I've ordered another kit. This time to make an oversized Prince, possibly with a plateaux rim on the bowl. But that'll be another story. lol
 
Not only are you a gentleman and a scholar, a man of wisdom and wit, an erudite soul with impeccable taste, posting flawlessly eloquent communiqués that rarely fall into incoherent mishmashes of drivel while keeping your brothers of briar in the loop on your latest project, it now turns out that you are a skilled pipemaker! Indeed!

Bravo, I say. Bravo to that!

Seriously, you did a fantastic job. And what a piece of briar it turned out to be: a straight grain cut!

There is some real talent on this board. I can only admire this from afar, being a general klutz when it comes to making things.

One question: you seem to have a pretty inclusive workshop and certainly an acquired skill prior to making this Poker. Is the workshop used primarily as a hobby or a full time job? Have you considered taking pipemaking one step further by producing them for sale?

Bravo encore, Blackhorse!
 
It is truly a beautiful pipe and a real work of art. You are a talented artisan. Congratulations!!!
 
If I had a Blackhorse Hallmark...I likely would. Always wanted to get one of those stamps made. I guess there's ONE guy that does them for almost all the pipe makers. I'm certain it would be quite costly. Hence the reason why I don't have one. Maybe I should tackle one of my big crummy punches with some diamond bits and see if I can "carve" my own. Hmmmm.

Maybe I could make one that's a horseshoe and my initials or something. I'll have to think on this one!
 
Top