An Exercise in DIY Rustication with Dremel

Brothers of Briar

Help Support Brothers of Briar:

This site may earn a commission from merchant affiliate links, including eBay, Amazon, and others.

ontariopiper

Well-known member
Joined
Mar 10, 2015
Messages
617
Reaction score
12
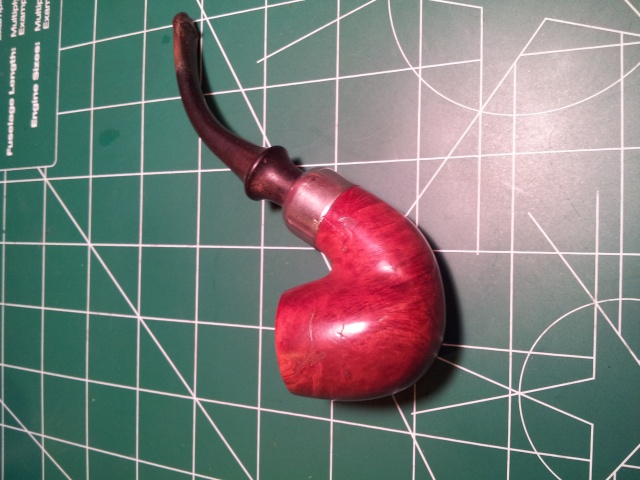
I recently acquired a little Wellington-style pipe on ebay. It arrived absolutely filthy, but it cleaned up ok, albeit with a LOT of elbow grease!

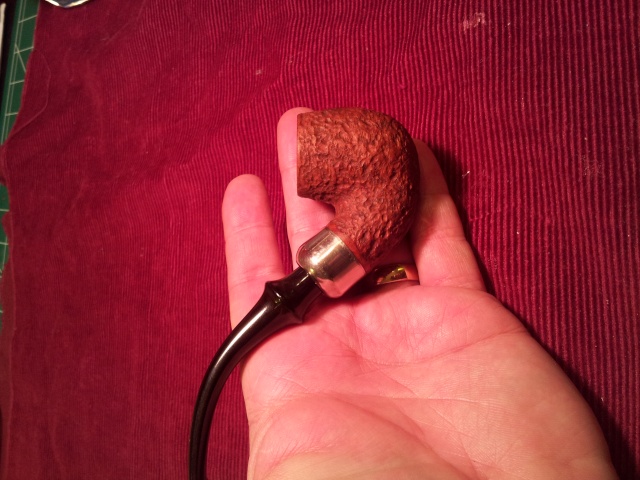
After cleaning, I noticed what looked like a scratch on the bowl. After removing the old varnish finish, the flaw turn out to be an old fill that, along with a few more of its relatives, literally fell out of the stummel. The old varnish was the only thing holding these fills in, it seems!

Not having a supply of briar dust to replace the fills, I decided to try something new - rustication! I bought a small assortment of small wood carving bits for my multitool (generic dremel) and went at it today. Results were fast (less than 30 minutes for this little bowl) and I'm quite pleased with the look of the pipe. The colour of the pipe may change when I get some darker stains in, but the general effect is nice, and the pipe feels good in the hand.

Hope you like the pics!  :D

Before:

20150417.jpg


After initial cleaning/stripping of varnish:


During rustication:


Finished (still needs a good waxing):


Before & After:

 
That turned out pretty well, nice job. I have an XL Peterson System pipe that I think could benefit by rustication, it's really a plain Jane as is, and has some fills that are quite noticeable. I have a Dremel but lack the courage and skills to pull it off.

 
Thanks, guys! I had fun doing it.

And RJ - I have nothing special in the way of skills when it comes to pipe restoration. Total noob, actually. Of course, working on a $15 estate pipe is a lot different than an XL Peterson! This was definitely a low risk, high reward adventure. $25 or so, all in, including sandpapers, carving bits, etc.
 
juanmedusa":pxvibo74 said:
You've got a future, brother.
Hey, thanks! That's very flattering. I'm hoping to build the skills to try my hand at making a new pipe at some point. These cruddy estate pipes seem like a good starting point - cheap to try, and each pipe brings its own challenges and rewards on the path to restoration.

I haven't been able to find anyone in my area already doing this, so I'm relying on online self-directed learning to pick up the rudiments of the craft. Forums like BoB are an essential part of that for me!
 
Superb job OP, and all with a dremel! Looking forward to seeing how it looks when the wax is on.
 
Thanks gents! I appreciate the support.

In the spirit of adventure, my next refurb attempt will be using the briar dust collected from this rustication to fill similar pits and scratches in a larger wellington-style pipe I got in the same eBay lot. :D

I'll post that one when finished too!
 
Nice job dressing up that Pete! :cheers: :cheers: :cheers:
 
Thanks to all for the very kind comments. It's reassuring to know I'm on the right track with all this! :)
 
Yeah great job on that rustication. Looks better than most actual Peterson finishes..
 
I love a well done rustication...which is far from being an easy thing to pull off.

You easily did just that. The rusticated finish is far, far more handsome than the smooth from which it was made...and with a better surface area for cooling...you re-engineered is very well. Congrats!
 
DrumsAndBeer":t62cczkw said:
Yeah great job on that rustication. Looks better than most actual Peterson finishes..
High praise, indeed, DrumsAndBeer! I'm only just starting to assemble the basic equipment for decent refurbs, so everything to date is more or less done by hand or by rotary tool. Keeping my eyes open for a used buffer (using my drill press in the meantime) and will be putting in an order for polishing compounds and waxes before too long.

If I can keep the expenses low enough not to arouse the wrath of She Who Must Be Obeyed, I may just be able to set up a decent starter shop for myself. Work over a hockey sock of estate pipes, and then maybe start looking for actual paid refurb jobs. Who knows!
 
That pipe turned out quite nice!  What style bits were you using on your Dremel?  Were they like these?

125-90.jpg
 
JustTroItIn":psitvq3v said:
That pipe turned out quite nice!  What style bits were you using on your Dremel?  Were they like these?

125-90.jpg
The carving bit that I used was like the one labelled 190 in your pic. Very small round head that I used to "dot" the surface of the briar in a random pattern. Keep a firm hand on the dremel, as the bit will wander or dig too deep if you let it. :)
 
Top