You are using an out of date browser. It may not display this or other websites correctly.
You should upgrade or use an alternative browser.
You should upgrade or use an alternative browser.
New Project...Two Malaysian Parangs
- Thread starter Blackhorse
- Start date
Help Support Brothers of Briar:
This site may earn a commission from merchant affiliate
links, including eBay, Amazon, and others.
Thanks. And also for recognizing the correct species! lol
Being half Norwegian in terms of family history, etc. I adopted the glyph of the Reindeer used on the handle as a kind of personal maker's logo and I usually hand carve one on the knives and handles that I make. I think the original rock art that I used as a basis is in Alta, Norway. The conifers represented on the handle are also a nearly exact copy of some found in the rock art in the Alta area. As I've said before I love the Nordic style of knives...their 'form follows function' ethic, the deceptive simplicity, the clean lines and extreme emphasis on the quality of the materials used (super steels with a balance between edge holding and ease of maintenance). On my personal pocket knives I'll usually opt for some of the ubber cool and super tech stainless powder steels used today, but in fixed blades I prefer high carbon steels that above all else will hold a scary sharp edge nearly forever.
Time for some shameless self-promotion - examples of what I like to do follow:
A Leuku made with a Kankaanpaa blade of Bohler Uddeholm 0.8% carbon steel and African Blackwood / ivory micarta and nickel silver spacers. This one has a 'partial convex grind'.

A knife made for a BoB bro...EnZo D2 blade with Snakewood handle. Convex grind, which is my favorite.

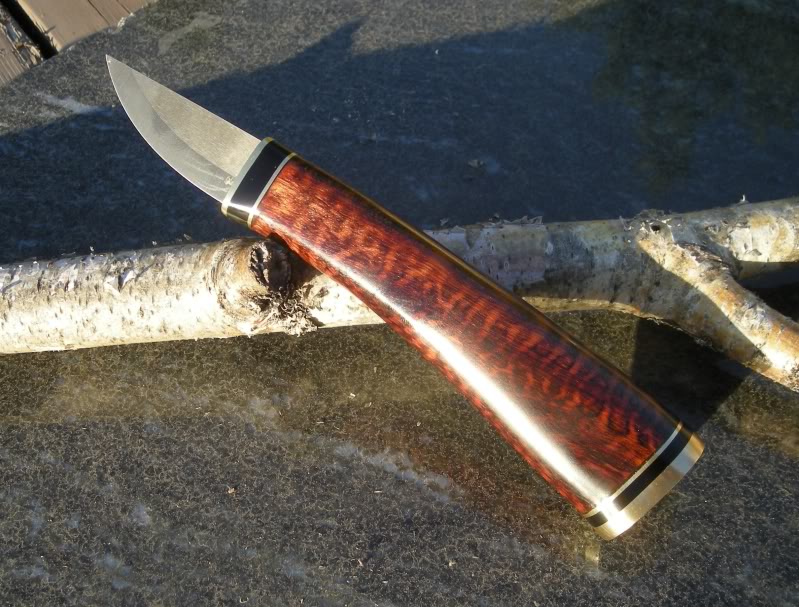
My favorite...a personal carving knife...2 1/4" Roselli Ultra High Carbon (a proprietary steel with a carbon content of 1.5 - 2.0% hardened to HRC of 64 - 66) blade with Snakewood handle, brass and black micarta guard, cap and spacers. Scandi grind.
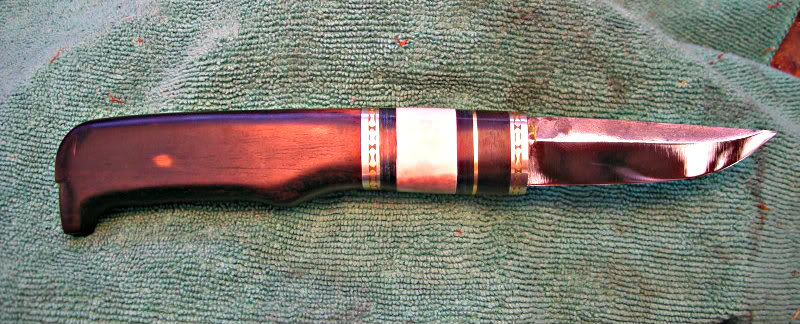
And the first one I did that has a Yrjo Puronvarsi blade (hammered out of old Krupp carbon steel, unique with their rhombic transversal section, i. e. they are thickest in the middle where the grind line begins) and a handle of Gabon Ebony and Reindeer Antler, etc. in which the butt forms a stylized head of a seal, complete with sterling eyes and nose holes (these latter are tube form which the eyes are solid...so she can breathe! lol). The spaces are black micarta, nickle silver and brass and two are file worked (which I'll never do again as the fitting was a total bitch and ended up about 'half right' - but quite 'festive'!). A scandi grind.
Being half Norwegian in terms of family history, etc. I adopted the glyph of the Reindeer used on the handle as a kind of personal maker's logo and I usually hand carve one on the knives and handles that I make. I think the original rock art that I used as a basis is in Alta, Norway. The conifers represented on the handle are also a nearly exact copy of some found in the rock art in the Alta area. As I've said before I love the Nordic style of knives...their 'form follows function' ethic, the deceptive simplicity, the clean lines and extreme emphasis on the quality of the materials used (super steels with a balance between edge holding and ease of maintenance). On my personal pocket knives I'll usually opt for some of the ubber cool and super tech stainless powder steels used today, but in fixed blades I prefer high carbon steels that above all else will hold a scary sharp edge nearly forever.
Time for some shameless self-promotion - examples of what I like to do follow:
A Leuku made with a Kankaanpaa blade of Bohler Uddeholm 0.8% carbon steel and African Blackwood / ivory micarta and nickel silver spacers. This one has a 'partial convex grind'.
A knife made for a BoB bro...EnZo D2 blade with Snakewood handle. Convex grind, which is my favorite.
My favorite...a personal carving knife...2 1/4" Roselli Ultra High Carbon (a proprietary steel with a carbon content of 1.5 - 2.0% hardened to HRC of 64 - 66) blade with Snakewood handle, brass and black micarta guard, cap and spacers. Scandi grind.
And the first one I did that has a Yrjo Puronvarsi blade (hammered out of old Krupp carbon steel, unique with their rhombic transversal section, i. e. they are thickest in the middle where the grind line begins) and a handle of Gabon Ebony and Reindeer Antler, etc. in which the butt forms a stylized head of a seal, complete with sterling eyes and nose holes (these latter are tube form which the eyes are solid...so she can breathe! lol). The spaces are black micarta, nickle silver and brass and two are file worked (which I'll never do again as the fitting was a total bitch and ended up about 'half right' - but quite 'festive'!). A scandi grind.
D
Deleted member 2386
Guest
Wow, hadn't seen this thread before. Just...wow.
How is it? In what way?
OH! Well, I haven't gone out 'whacking' with it as yet, but the antler actually has a very non-slick feel to it...and the curved shape has a really natural feel in the hand.
I've read, in a blog done by a guy in Malaysia that sells these things and has extensive blog entries about their shapes and use and re-handling, etc. that the natives that use them daily have a specific and unique technique which involves allowing the piece to kind of rotate in the hand slightly when chopping (they are a chopping tool).
The following are links to some really interesting photos done by Jason, who runs Outdoor Dynamics (the Malaysian outfit that sells these things. Other links follow. On the photo page, scroll down to "Blacksmith at Bidor".
http://jasonongsg.multiply.com/photos
This next site is the motherlode for information on Parangs - per the Malaysian connection...tons of good information. Check out the Sept. 24 entry, re: grips, etc.
http://www.junglecraft.com.my/index.php/category/gear/machete/
Sure... File steel makes a great knife...but it has to be annealed (heated to make it soft enough to work, instead of brittle) then you grind or file or sand it to shape, then it needs a second heat process to realign the crystal structure (heated til it's non-magnetic) and then a last heating in an oven at low temperature. In trying to grind down a file you would be working against steel's hardest form. So soften it to work it then bring back the hardness to hold an edge but without the brittleness of file steel. Simple!
It's not sarcasm at all. You can do the annealing and the heat treating with a torch...usually an oxy-acetylene setup (which I don't have as they are quite expensive - at least for my budget). I have an oxy-ethylene outfit (about $60 at Home Depot, Lowe's, etc.) that isn't ideal, but will get up to temp. The slow heating after the main heat treating is done in a kitchen oven set at something like 400 F for a half hour (I have to read up on that to remember exactly what the specs are) but then you just turn the oven off and let the steel sit there overnight til the oven is room temp and that's it. It's the torch work that's touchy...and then the quenching in oil, etc. Again, there are TONS of 'how-to's' on the internet.
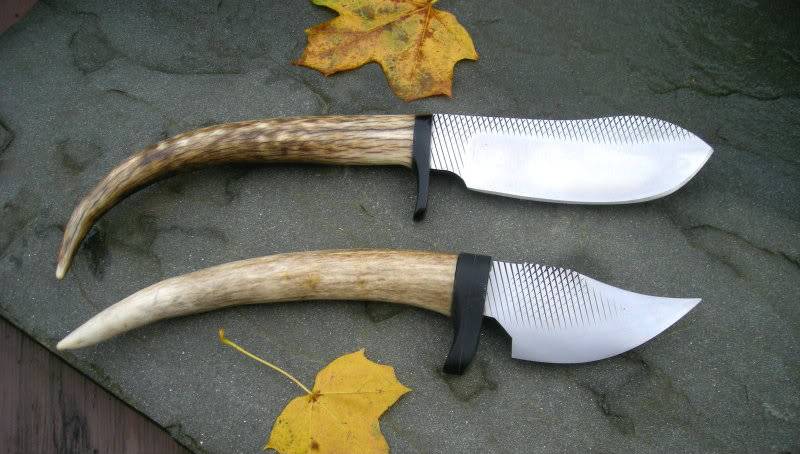
Here's a few pics of the project I have and the one that the friend sent. Obviously, his is the large one. The cool thing you'll notice is that these still have the indents from the file cuts in place to give a surface texture. I love the effect. They are made from a file that's a rasp on one side and a file on the other (as you can see). The big one is in the form of what I call a "Canadian Skinner" - very traditional American/Canadian form. Mine is being made as a mate to it...a very large 'Caping' kind of blade. Notice along the top of my blade, I left the file grooves that were on the edge of the file in place, to be used a 'finger ridges' that provide grip for the forefinger or thumb while working. You have to look closely as they are hard to see with my crumby photos. They're on the straight part just behind the upsweep on the top of the blade. His came with a sheath (not shown) that I may add to with a piece of leather into which my blade will fit, forming a sheath into which both blades fit. I think I've got that pretty much worked out, but it's still in pieces. I also included a shot of mine "exploded" that shows the tang, black micarta guard and antler handle as seperated pieces, to give you a feel for how they were fit together.
The pics:
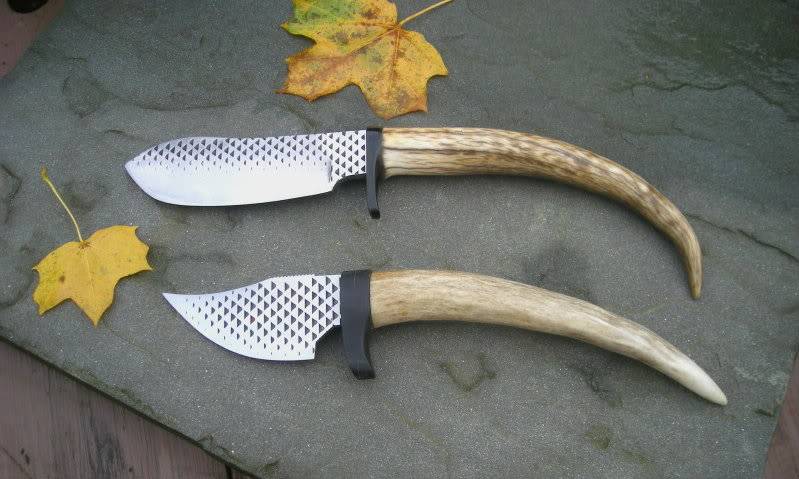
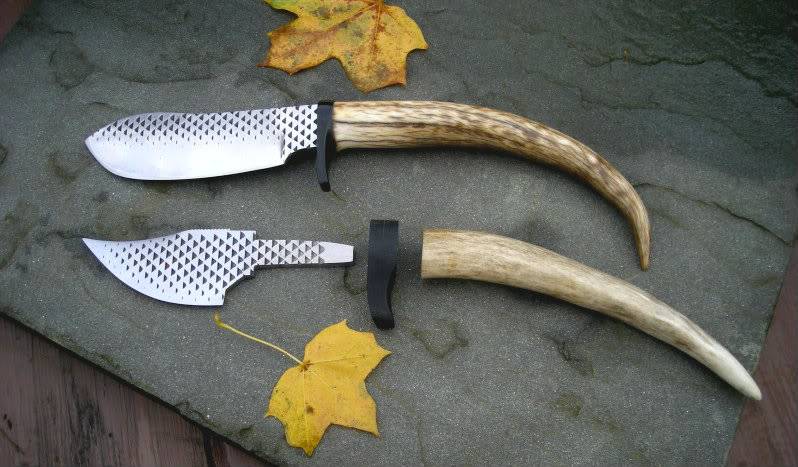