PIPE CARVING CONTEST RESULTS

Brothers of Briar

Help Support Brothers of Briar:

This site may earn a commission from merchant affiliate links, including eBay, Amazon, and others.

mark

Well-known member
Joined
Jul 2, 2008
Messages
4,174
Reaction score
16
Well it's time to pull the plug on the poll and post the results. Pipe carver number two got the most votes and gets bragging rights for the year. I thought all three were exceptional in their own way.

I think if you wanted to post your impressions and opinions on the pipes in a constructive way it might be beneficial,,,not that there's anything wrong with any of them,,,I just think it would be interesting to hear what people think,,,,Maybe the carvers could comment on any problems they ran into and how they solved them,,,
 
Hey I came in the top three, :cheers: what do you know. I had the pipe in the first picture; comments, ideas, criticism are welcome. Let me know what you think.
 
i.keenum":u9kjqj3r said:
Hey I came in the top three, :cheers: what do you know. I had the pipe in the first picture; comments, ideas, criticism are welcome. Let me know what you think.
Hey I like your pipe,,I had one somewhat like it and enjoyed every bowl I smoked in it,,,It now resides in my friends house because he fell in love with it and whined and begged with tears in his eyes until I relented. He offered his first born for it but she's eighteen and my wife gave me one of those looks,,,I pointed out the girl could do the housework but then I got "the stare".
I like the rough exterior and the asymetrical shape. Looks like it fits the hand especially well and the color is nice. Should be a great smoker,,,congrats on making a great pipe, glad you shared with us.
 
I really liked all 3 pipes, which is why i didnt vote...couldnt decide.

The first pipe would have been my favorite, if the "bridge" part of the block was removed between the bowl & what would then have been the shank, and the bowl cut down a little shorter. Rustication/smooth combo looked good & worked well i think.

2nd pipe would have been my favorite if the bowl was more dublinish and tapered towards the bottom. Im a sucker for plateaux top and love a bowl that sort of visually grows from the heel up to an awesome crown of plateax on the rim. Liked the choice of color & the finish job on it.

3rd pipe would have been my favorite if the curve where the top of the shank meets the bowl matched the curve of the heel. Just a little more wood removed at that junction there. Shank adornment was a nice touch & looks great with that stain, and i think the shape overall would be pretty snazzy with a bit of work at the junction and maybe a tiny bit of bowl shaping so it wouldnt be just straight up walls.

Again, i liked all 3 pipes and they all look like some care and effort were put into them. There would be a spot in my racks for any of 'em. Well done.
 
mark":fk7yrhdy said:
Maybe the carvers could comment on any problems they ran into and how they solved them
Hey guys, I've been following the board but not posting much lately. First off, congrats to the winner! I made pipe #3, and was very impressed with the quality of the other two pipes. Fine jobs!

Now that the contest is over, here are some pics I took along the way, with brief descriptions of what I was doing.

To begin with, I bought a plateaux block kit with both a regular stem and a churchwarden stem. I know my finished pipe doesn't look like a plateux because it's not "raw" on the top, but that's mainly because I wanted the bowl to be a little shorter, so I sanded it down.

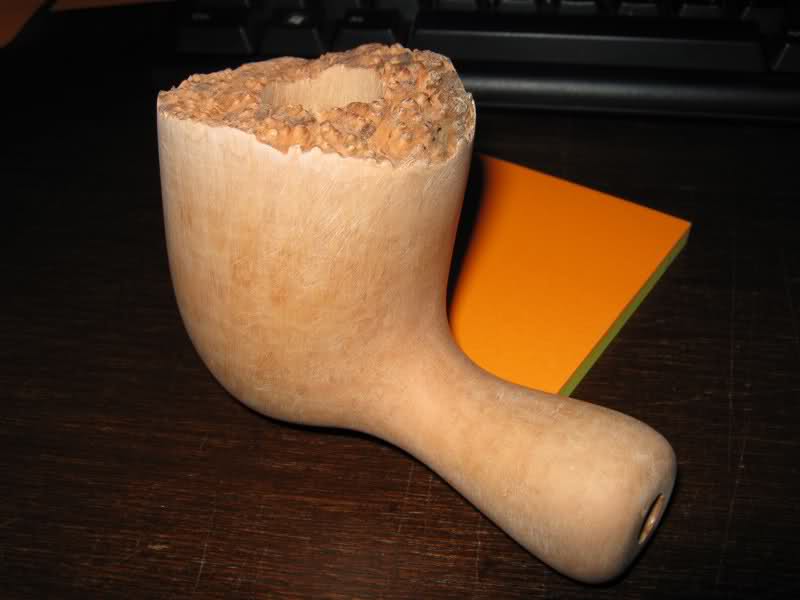
Unfortunately, I didn't take a picture of the raw block. I only took a picture after I'd worked on it a bit with my 
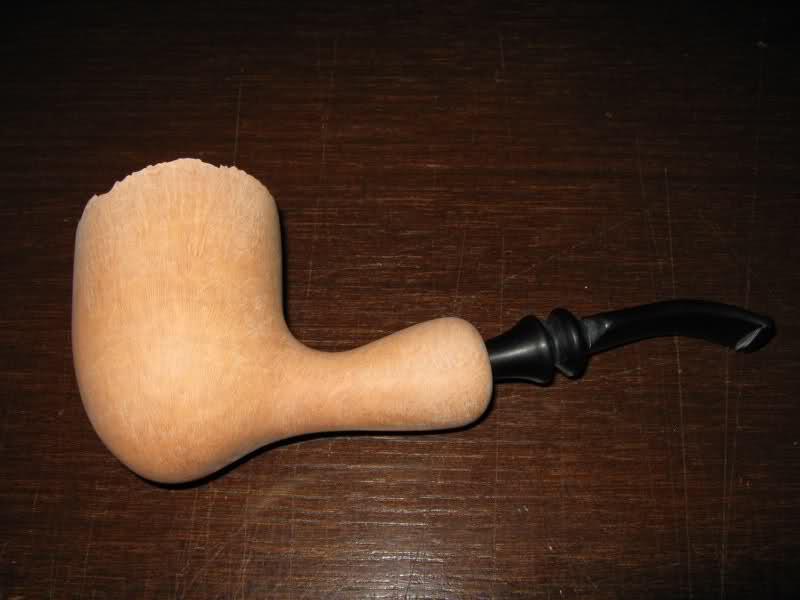
drill/sanding wheel setup. This is a pic of the stummel and stem after initial sanding, and some supplies I picked up at Home Depot for the job

D870897_240969_41473


I wanted a nice decorative metal fitting on the end of my stummel, so the first challenge was to create that fitting myself, since I had no idea where to get them online or what they were called (I eventually found them, but forgot what they are called again, so I'd have to dig around to find them). But I DID know where to get a threaded brass pipe cap, so that's what I bought at the hardware store for a few bucks, and I hand-whittled my stummel to fit the internal diameter:

D870897_240969_41480


Another shot of my whittling work:

D870897_240969_41495


Once I got the stummel whittled down to the right size, I took the brass cap to the drill press to put a hole in it so I could fit the stem in:

D870897_240969_41406


And then I fitted the cap onto the stummel with gorilla glue. It threaded on nice and tight and locked into place, never to move again:

D870897_240969_41490


After that, I spent several days just sanding and sanding with 180, 400, and even 600 grit sandpaper until it was so smooth that it didn't even feel like wood anymore. It felt like some kind of plastic. Then I took it to the drill setup again, this time with a buffing wheel and tripoli compound, and buffed it until it was shiny. Then I bought some alcohol-based leather stain and gave it a once-over (staining my hands yellow for a week in the process!). Then heated up the stem in the oven and bent it like I wanted. I decided not to use the churchwarden stem on this pipe. Once bent, I sanded the stem the same way I sanded the pipe, with progressively finer paper and then tripoli. Then I buffed both the stem and pipe (assembled) with carnauba wax on the buffing wheel until it looked like this:

D870897_240969_41344


D870897_240969_41337


D870897_240969_41348


I had a number of challenges and setbacks along the way:

* I almost took off too much wood when sanding the side walls. I mentioned this in a previous post. Don't continue to sand when you're getting tired!
* I stained my hands yellow with the leather stain because I didn't wear gloves.
* At one point, when I had almost finished the buffing of the stummel, the buffing wheel yanked the stummel out of my hand and flung it down hard on the concrete garage floor. It put several gouges in the side wall, the lip, and the rounded bottom of the stummel, and I had to go all the way back to 180 grit sandpaper to work the gouges and scratches out. Keep a firm grip on the stummel when buffing!
* I mistakenly buffed the brass fitting first with tripoli, then moved on to the stummel. You know what happens when you polish brass? It turns your buffing wheel/cloth BLACK! And then that transfers to the unfinished surface of your pipe! I should have buffed the brass last. Instead, I had to toss that buffing wheel and use another one.
* Someone else already mentioned this in this thread, but if you look at the shape of the bowl, you can see I didn't sand down as far as I could have on the stem-side of the bowl. This is because I ran into a knot or something right at the bend, and the more I sanded, the more the knot opened up. I decided not to go into the wood any further in that area for fear of opening up a hole or something. I wish I had kept the stummel "thicker" so I could have stopped as soon as I noticed the knot and still had a nice shape. But I was already committed to the rest of the shape because I'd started with the bowl and sidewalls.
* I rednecked it up by using a brass plumbing fitting instead of a real smoking pipe flange or sleeve or whatever it's called. The end results were okay, but I would have rather had a nickel fitting or something that was easier to work with.

Lots of lessons learned! It was a great first pipe experience. Hope this encourages others to take on this project. I mean, if *I* can make a decent pipe out of glue and plumbing fittings and a drill, ANYONE can, trust me!

Oh, and btw, the pipe smokes great! It's a bit of a hot smoker because of the thin sidewalls, but not really any hotter than my Savinelli (which is also on the thin side).
 
Thanks for posting that SingleMalt....,,lots of information there. Using the brass nut was pretty crafty. Your pipe came out great, and the stain job looks professional. I'd have quit chasing those pits and left them just like you did,,,a little reminder that nature isn't perfect. Sounds like a good experience overall, and thanks for sharing ,,,,
 
mark":5yjfj2kt said:
Maybe the carvers could comment on any problems they ran into and how they solved them,,,
:) thank you all Brothers...
i seriously thought that i would just participate - not win ... the pipe is not that exceptional when i look at it now :) ... she has more than several issues that need to be changed in order to make it better - and the block had potential to be made into a better pipe......
..
first - i ordered a bent pipe kit... because of that i choose a fancy type of mouthpiece... after receiving the kit, i have seen that in reality i got a straight pipe kit and a fancy mouthpiece... there was not much to do about it - had to work with what i had..
second problem i had was the size - yes, you read it good :) - the block was huge :)... i sent the drawing of what i wanted to make (it was something like a freehand Nording) to the pipe kit supplier and they have told me that the medium sized block will not be big enough.. so, i ordered a bigger one... at that time i was not thinking to make more than 2 pipes in a whole year (because of the money i had available but eventually i got hooked and found the way to make more)...

huge block gave me the chamber that is over 6cm high :) :) ... i could easily sand it down but i wanted also to keep the bark of the plateaux so, i had to figure what to do...the result can be seen in those pictures... a huge pipe that smokes preety much cool for about 4hours (my guess as i never filled it all the way to the top)...
in fact this was a really nice block to start with... no dots, cracks or anything on it... very nice....

i was making that pipe for myself for arround a month and a half - this took me so long just because i did not have all the tools - polishing wheels were needed...
she has several layers of carnauba there and surface looked really nice - i had luck to make it look nice first time i did it...
those are sweet memories when i look at it now - i am still using her but not that often mostly due to her size... :)
..
once again - thank you guys for votes and everything....
best regards
daniel
 
pictures ... :)
(sorry about the different sizes - some of the pic's are to big to fit the forum window but they were just pooled from my Tinypic databse on internet - hope noone will mind)...

51vw4x.jpg


4j3rco.jpg


210gig5.jpg


4v06ki.jpg


2vbto9s.jpg


6e20jn.jpg


21l90fl.jpg


4uaxqf.jpg


2lut0fc.jpg


2pte4qc.jpg


2luyxpf.jpg


28k65va.jpg


2gxnw2t.jpg


2mx0bx4.jpg


1zwbzaa.jpg


2z4ib21.jpg


2cel11s.jpg


1zbxves.jpg


2w4d99x.jpg


fucrvk.jpg


2nqz4eq.jpg


6f76t2.jpg


6xqov9.jpg


30m5pb4.jpg


qybksg.jpg


2psqdkk.jpg


2e3pov5.jpg


23it2qf.jpg


vgq49u.jpg


1hw7cy.jpg


@SingleMalt - using a brass nut was a nice idea and a really good job... i can imagine how long you needed to file that down and polish and everything... this is a great work... congtratualtions...!!!
 
tNd:

Once again, stunning. The squiggly grain was really a plus, it looks like combed wool...it's great.

One question: how do you stain the top/natural side of the briar black, or moreover, what is used? It was well-executed in this case, too.
 
on this one - i used a black alcohol stain to paint it black and when i applied carnauba on the rest of the pipe i put small pieces of carnauba and melt them using a heat gun ... works great but a pain in the as* job...
today, i use a schelac to finish the bark top... much easier and works great... :)
...
 
tNd":84a454sj said:
on this one - i used a black alcohol stain to paint it black and when i applied carnauba on the rest of the pipe i put small pieces of carnauba and melt them using a heat gun ... works great but a pain in the as* job...
today, i use a schelac to finish the bark top... much easier and works great... :)
...
Nice! Gives me some idea of how I want to approach a pipe in the future.

So, shellac, eh? I use that to finish some of the stocks on my old Russian rifles (hey, it was good enough for them) and when it gets hot, it tends to bubble up a little...ever had that happen with pipes? Otherwise, it's easy to re-finish if needed, just a little denatured alcohol and smooth them right out again. I both love and loathe working with shellac.
 
All the pictures here are very helpful and interesting. Thanks for taking the time to post them.

Daniel - your block was very impressive and resulted in one of the nicest grain patterns that I've seen in a long time. You mentioned a little about the kit...but not where you got it. Would you share that information?
 
Kyle Weiss":u0c2b89p said:
tNd":u0c2b89p said:
on this one - i used a black alcohol stain to paint it black and when i applied carnauba on the rest of the pipe i put small pieces of carnauba and melt them using a heat gun ... works great but a pain in the as* job...
today, i use a schelac to finish the bark top... much easier and works great... :)
...
Nice! Gives me some idea of how I want to approach a pipe in the future.

So, shellac, eh? I use that to finish some of the stocks on my old Russian rifles (hey, it was good enough for them) and when it gets hot, it tends to bubble up a little...ever had that happen with pipes? Otherwise, it's easy to re-finish if needed, just a little denatured alcohol and smooth them right out again. I both love and loathe working with shellac.
you use just a small amount of schellac - just to finish the bark, not more than that... :)
 
Blackhorse":x7slls9s said:
All the pictures here are very helpful and interesting. Thanks for taking the time to post them.

Daniel - your block was very impressive and resulted in one of the nicest grain patterns that I've seen in a long time. You mentioned a little about the kit...but not where you got it. Would you share that information?
i have not told anything about where i got the kit just because i am using this company even now and i am happy with their service but the first time i ordered i got the wrong order - so, i did not want to give them any negative feedback ... in fact the company is good and reliable in my opinion they just made an error the first time ... but despite that error, i got a really nice block to work with... so, i can't complain :) :) :)

so, no negative feedback here.... the company is PIMO...
Pimo link

the block i got was UP2+ in a Prebored briar section.....
 
Hey tNd im considering carving a pipe...I emailed PIMO 2 days ago...no response yet. Is this normal for them or were they prompt. Not trying to make a bad name for them or anything just wondering if maybe they didn't get the email.
 
Boxerbuddy":f4heuklc said:
Hey tNd im considering carving a pipe...I emailed PIMO 2 days ago...no response yet. Is this normal for them or were they prompt. Not trying to make a bad name for them or anything just wondering if maybe they didn't get the email.
I wondered the same thing, as their site is so..."vintage", but my order went through, and I was pleased with the item they sent.
 
Top