A Tinsky Pipe Kit

Brothers of Briar

Help Support Brothers of Briar:

This site may earn a commission from merchant affiliate links, including eBay, Amazon, and others.

Blackhorse

Trading Post Moderator
Staff member
Moderator
B of B Supporter
Council Member
Joined
Oct 23, 2010
Messages
13,300
Reaction score
1,917
Location
Oregon City, Oregon - USA
I got sidetracked by the Mario Grandi thing, but wanted to get this down so I'd actually have to follow up later with more detail...likely more than you ever wanted to know or whatever.

Yesterday I ordered a pipe kit from Mark Tinsky over at the American Pipe Smoking Company ...site...place...thing...whatever! I thought it might be fun and instructive to sort of 'blog' the experience (in moderation) for other guys that have considered making their own pipe.

So I have one on the way. It will be my fourth or fifth kit. The first were all generic kits from generic vendors. They turned out fine, and since I'm a carver (walking sticks, canes, other bizzare stuff) that part was easy...in fact it took over (like it usually does with me) and the pipes turned out to be more 'carving projects' than pipe projects. Which is fine...but this time a wanted to end up with a classic item.

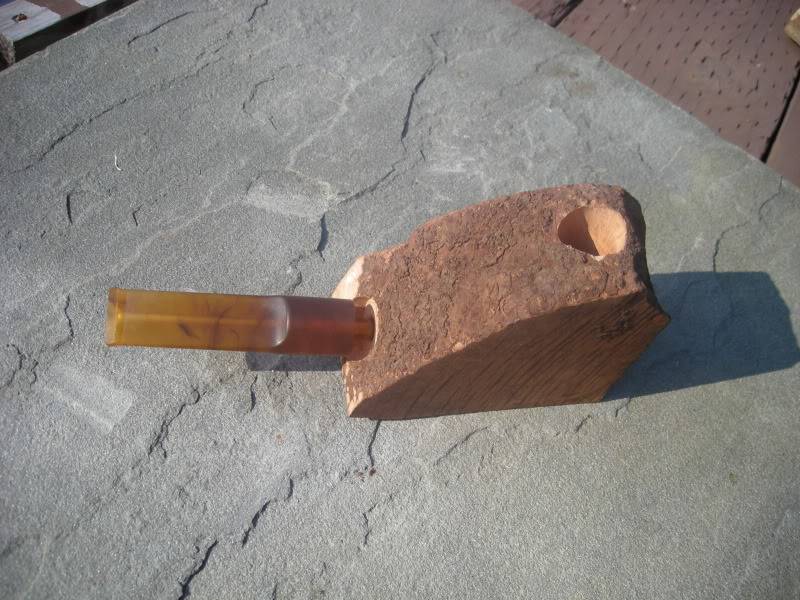
After a little looking around I settled on Mark's system as being exactly what I wanted. Mark requests lots of detail, photos, etc. so he can (get this) pick the most appropriate block and bore the holes in just the right way to be perfect for you. So, like, don't change your mind about your project mid-way or you're TOAST! lol Anyway, I ended up with the largest size chunk of platteau you can order (Mark's direction) and for the same cost as most anyone else charges for something I guess they just find under a tarp in the back of warehouse (blah, blah, blah) I get a block drilled specifically for my intended design...an oversized Poker.

This is what's on its way...but with a different stem:

PK10-12.JPG


As I go along I'll try to provide a reasonable series of pics so there's SOME level of visual interest. Other than that I'll keep things to a minimum, describing what I'm doing and anything that comes up I think others would want to know re: tools, materials, processes, etc.

BTW: Mark indeed lives up to his reputation. Easy to work with, good information, super fast service...speaking of which, get this: I first contacted him let's say on a Wednesday...placed the order the next day...that same day he selected and drilled the block and on the day after it was in the mail and on its way. OK - I'm officially amazed.

More to come.
 
Boy, me too! It'll be the heartwarming story of a young man, finding himself, in technicolor, coming of age, produced by Walt Disney Studios, answering to no one but himself, finally conquering the evil fates that have...HUH! Oh yeah, the pipe thing. I guess if Disney DID do it, it would be starring Goofy.


Well, anyway, at this point I'm kind of cleaning up the shop area and getting some of my tools ready with a prepertory cleaning and sharpening (tools meant to be sharp, need to be 'scary sharp'). As I remember, my first step in the past pipe projects was to reduce the block to roughly its final shape (leaving a good amount of extra for safety's sake. I mean, if I wanted the pipe's diameter to be two inches, I'd leave a quarter inch extra - as working surface. I set the block upright in a well padded vice (I've just got a new one for Father's Day that I can rotate 360 degrees on two axis...nice)and mark a vertical line along the outside of the block that would be the front of the pipe...then the two sides...in pencil. Although they don't have to be, I like to make these cuts as close as I can get to 90 degrees from each other, so as to form a boxing of the front and sides. This helps me keep things as balanced and even as possible (and boy do I need the help) as the rest of the cuts and filing and carving gets underway.

The Vice:

144592_400.jpg


The saws I'll use...oh, hold on a minute. I didn't mention that 90% of all the work I do is with hand tools. I've got a dremel with a flex shaft attachment, a good LI-Ion Drill and a grinder/buffer (el cheapo garage sale) to apply the carnumba wax as you can ONLY put that stuff on via a fast moving cloth of felt wheel. Other than that it's all by hand...the Armstrong Semi-Automatic System. There was a point back about 5 years when I could go either way...invest in some really nice carving tools (Japanese saws, chisels, gouges, mallets, files and rasps, etc., etc., etc.) OR go in for a few middling benchtop power tools (bandsaw, drillpress, etc.) I picked the hand tools. I love 'em. There's nothing like the feel of a super sharp blade cruising through a smooth piece of wood. Further, you can get a uniuque understanding of what the wood ls like...what it's do...how much it'll take...when you can feel the tools work it. Conversely, if I had the power tools it'd take me about 1/10 of the time to do something. Well, we makes our own choices and then we lives with 'em.

Back to the saws: Which I'll use depends on how hard the briar is. Generally I don't feel it's a very hard material at all. I mean, look at how easy it is to get a bowl all dinged up! Anyway, I've got small, medium and tree size. It'll be either number one or two. The amazing thing about the Japanese pull saws is that they work twice as well for exacting cuts as traditional saws. They cut on the pull stroke...they're half the thickness...they have many more teeth per inch and they're sharper...and the handle designs are geared more to finesse cutting. As an example, I constructed an outside "garden shelter" (that ended up being my carving studio) with one Japanese Pull Saw (and the rest of the obligatory stuff like the power drill) and no extention cords running all over the place. That saw would zip through even a 4' X 8' with ease...and I swear it was faster cause I could cut things in place rather than drag 'em off some place else to use the skill saw or something. The only thing for me is that I have to be very, very, very carefull. It's easy for me to go off line and end up with a very interesting, but very off skew cut. But I'll comment on that later.

They look something like this:

149036_400.jpg


142419.jpg


So when the block gets here, I'll clamp it and cut it and sand it smooth (which goes fast) and wet it to get a good look at the grain...and see what I have to work with. All for now.
 
A tip that may help...A carver I had the opportunity to share a bowl and a pint with told me that he glues a block of scrap wood to the base of his work to allow clamping in a vise without damaging the work. This allows him more freedom while carving the block and results in a small flat spot (I don't think I've ever seen a poker by him) that makes his design free standing. Of course, a poker would have a flat bottom anyway.
Good Luck!
 
Interesting ideas. There are a number of "carving vices" out there that have a plate that the vice grips. The plate has holes for screws that one inserts into the carving project. Of course this doesn't work with a pipe. I'm now working on converting a pipe that came to me with a broken stem...and aside from that was the ugliest item I've ever seen. Some time I'll post a thread on the conversion, as it is undergoing a significant transformation. What was once a crooked platteau top has been trimmed flat. Also, an application of partical 'decorative' rustication in sort of swirls has been totally filed and smoothed away...to be replaced (as with me is often the case...can't ever leave well enough alone) by an incised celtic knot and horsehead design that wraps around the pipe. I think it'll end up quite interesting, if a bit non-traditional. Anyway, that bit was meant to bring out something else...that while working on the incised design, etc. I trimmed a piece of branch so that the end is dowel-like and inserts into the bowl. I can then twist the pipe into different positions while 'mounted' like that, with the 'dowel' clamped in my rotating vice. It affords a wide range of positions and works rather well...allowing the stress of carving to be distributed to a larger area of the pipe so as not to stress any one area overmuch...and of course the briar doesn't come into contact with the vice. I'll add that the pipe isn't rammed onto the dowel thing...just a nice friction fit.

But the idea of flattening the bottom of the bowl and gluing it to a 'holder' is, I think, quite sound. I might give it a try. As one of my containers of 'Tite-Bond' glue claims that a resulting 'join' is twenty times strong than the wood it bonds...that claim might come to the test as well. lol

Re: the rustication tool...yes, very nice, quite impressive. Even the large bowl that I intend might be overmatched by such a significant tool however. When browsing through online woodworking and carving sites as I often do for recreation I've come across a large number of "power carving' tools...most quite expensive ($200 - $400 with the desireable ones being at the top end of the scale of course). There are also flexible shafts that one can find for fordom and other brands that convert the rotating action of dremel style tools to a reciprocating action that will 'oscillate' at the same insanely high level as the rotation of the tool...but only when the tip of the gouge or whatever bit is placed into the end encounters resistance...meaning when you push it into the wood slightly. Then the bit glides through the wood as you quide it forward...with great care. These might also overpower a briar, as briar is not really all that hard...and I've found that the delicate control offered only with hand tools to be usable (in my case). Of course this is different than the set-ups they much use when making the 'machine-made pipes' that I think turn out multiple pipes carved using a jig assemly or something. Often while filing away at a piece of wood or metal I've wondered why someone hadn't revised those reciprocating carver heads to work with with small files or saw blades. Well, the other day I saw one of those at some website. Finally. Too bad they wanted something like $300 for it. Of course the proper action for a file is to be pressed into the material only on the forward stroke, so perhaps the files used in a tool like that would have to have some kind of special 'two-way' design or the teeth would wear, etc. Same thing with most saw blade designs. The ones with teeth anyway, not the ones for coping saws that have carbide or diamond or something all over a sort of circular blade and work ini any direction. Anyway, the reason I use hand tools if for the FEEL they impart to the user. You learn much about the material by the way in which it responds to the tools...which helps in making design decisions along the way.

Anyway (sorry for the digression) the most common power tool I've seen mentioned is the lowely dremel. I've got the same one I've had for maybe 15 years and it still works like a champ. It took me 12 of those 15 years to get used to letting the speed instead of the torque do the work. But I've finally got it down, mostly. Many guides to rustication direct the artisan to experiment (always a good idea) with various tips and actions and most say that they use from 2 - 5 different tools to achieve the final result. I guess they start with the coarsest bit (quite large actually, like a 1/4" ball or oval, and then work progressively smaller. I've used a screwdriver that I 're-engineered' on the end to a sharp gouge and then used a fine v-parting palm style tool...almost like a graver (used for engraving) to achieve the final look. Below is a pic of a pipe I did from a kit that sat for 3 years...smooth, and then underwent the rustication. I like the end result much better. It was done to hide some rather obscene pits. Also below is a pic of a tool made from the parts bins at the local hardware store by Tyler Lane I think, who has many good clues and leads on how to do this.

First the tool:

rusticator1.jpg


And then my pipe...done with 2 tools, neither of which was the above:

pipe3.jpg
 
142419.jpg


Now that's a tool! :shock:

I just want to make sure you're cutting briar. I think JLD used one of these for his project?

Have fun and keep us updated.

Cheers & Health,

Milan
 
Yeah...well as always I use what I have. I got one like that (not a super expensive Japanese one, I think mine's a Marbles of the same design with replacable blade which is nice) to use for flush trimming posts, etc. A nice feature is that there are two tooth designs, one for crosscuts and the finer one, which is what I almost always use. If you make an initial cut line and then line up you aim along the spine of the blade as you pull the cuts you can get some pretty online and well directed cuts.

In addition to the ones I pictured the one below is the one I use ALL the time - for all small and fine work. The blade is about 7" long with very fine teeth. It's about $14. Just my style.

fa6af020-b242-45f5-a12d-69cb85155c9c_300.jpg
 
Watching this one with interest.
My Uncle, a pretty fair woodworker uses those pull saws quite frequently. He usually keeps two different sizes in his regular work caddy.
 
Following a hard day in the shop/studio today, wherein the wind blew and the cloud threatened (it's an outside set-up so the weather plays a role in everything) but I got quite a lot done given the processes that I choose to use. I'll post a series of pics below...they're being uploaded to my picture site as I'm writing, which takes a while. There are shots of the kit as it arrived (a nice sunny day) and then shots in series of the block's progress through a few stages of being sawn and filed.

I won't suffer anyone with all the gory details that went along with setting things up for work. Suffice it to say that I became wary of my typical 'fast approach' methods and took things way slow. I was very concerned that I would measure something incorrectly which would lead to a futzed project. So it was more...measure three hundred times, cut not...measure another three hundred...figure what those cuts would do to the next stage, and the next, etc. I basically tried to work out the entire project in my head prior to doing cut one. A detail intended in step 47 might need something specific in stem 3...that kind of thing. But I finally got to work and made all of the major saw cuts and started filing off the next sections...taking care of most of the basics. I tried four different saws and ended up with the little stand-by. I think it's the one pictured directly above here. If I'd had a bandsaw the day's work would have taken me an hour...but I don't.

The pictures will visually explain most of what occured with the sawing stage.

I have to interject here that kudos have to go to Mr. Tinsky. What a master. I sent him an email after receiving the kit that I was concerned that one of the areas wouldn't have enough briar to fit properly. I'm sure he rolled his eyes. He answered, patiently telling me that after sanding he was sure there would be enough stock to allow a good fit...and it turns out that of course he was correct. I also expressed to him that I don't thing I'd ever seen a block of any kind of material that had been cut so 'close to the bone' - meaning that there didn't seem to be a spare 1/8" of extra briar on any dimension anywhere - his cutting was that accurate. Pretty amazing...AND...it has and will save me quite a bit of filing and sanding. Nice.

The saw cuts freed the shank from the block and then took off that area between the bowl and shank...leaving the bowl still within a large square of briar...special care being given to lop off the small section that freed up the base of what the bowl will sit on, which is on a different plane that the angle of the bowl and the top, etc. much like a Cherrywood...which this one will resemble more than a Poker if I put a little bend in the stem...which remains to be seen. I think that will end up being my last design decision after everything else is done.

After the sawing I got out one of my truely prized tools: an Iwasaki Carving File (one of 4 in my chest). These beauties are amazing files...with the 'teeth' chemically etched to sharpness and the teeth designed in a 'no load' manner. Benefit #1: When used lightly and directed at about a 30 degree from forward stroke they 'cut' or almost 'plane' the stock away. The resulting chaff is in the form of small thin shavings instead of wood dust (which falls to the floor instead of becoming suspended in the air and potentially inhaled). Nice! Benefit #2: the surface left by these files, even though they remove stock much faster than a traditional design, is smooth instead of rough and feathery...so excessive sanding of the resulting surface is far less. They are literally worth their weight in briar. Anyway, you'll see in the photos that after I squared the bowl with the sawcuts I filed the corners top to bottom. Doing this I could keep an eye on the shape of the patch being filed and so long as it was a good rectangle and not skewed, like a trapazoid or whatever, I could be assured that the panel was in proper orientation with the front, back and sides. See? There actually was a method to my admitted madness.

So that's where it sits for now. More when available. Film at eleven, etc.

And the pics:

DSCN0517.jpg


DSCN0531.jpg


DSCN0534.jpg


DSCN0540.jpg


DSCN0544.jpg


DSCN0547.jpg


Does it look like a Poker yet?

So why do they call it a Poker? It's designed so you can set it down when its your turn to deal.

Whew! That's enough for one day. I'm outta here.
 
Thanks for posting the pics, looks like it's coming along well! Looking forward to reading how things come along. I've got a saw similar to yours, and they are awesome.
 
I like the Thomas the Tank Engine ruler. I've heard Tom Eltang swears by them.
 
I've got a nail on while hang about 5 very good steel 'scales' (as a former instructor insisted they be called...always used to say that rulers were those like Queen Elizabeth...and we all chuckled as was our part in the little scene). I always seem to reach for Thomas as it's the right size for basic checks along the way.

In the future I'll have to lay out little dioramas, that sort of thing so you can see all my weird little tools and fetishes and such. The cool Sterritt File Holer, the 6' rubber Corral Snake, the bulging tin filled with diamond coated rotary bits (from my dentist), the glass snail, the fat old dog with a hump on one side (OH! That's Gracie. She lives here.) I'll try to find something unique, funny or interesting and include it in each pic from here on...sort of a 'value added' exercise. Don't worry...no tax.

You need to close your eyes and visualize...my "shop/studio" is enclosed within one wall (heh, heh) which faces south...west-ish...into the prevailing Fall/Winter weather. The other three sides are set up with drop-down shades that pretty much block wind 90%. The roof is Polycarbonate...indestructible...I think it would deflect a meteorite hit...and it lets through about 20% UV but 80% light. In the Summer I cover the roof with a standard white tarp...to deflect the heat gain. The outside dimensions of the 'building' are 8' X 8' with essentially a peaked roof allowing a very long overhang (about 3') on the weather side and only about 6" on the lee side, which just butts up against a fence and allows a place for Gracie to charge after squirrels and the odd cat, etc. The floor is built like decking, gapped about the width of a pencil, made of cedar 2x6's. The stucture above is suspended built around 6 uprights that are 4x4's...sandwiched by 2x6's on which the floor sits and.....

Well, I could got on and no one would get a feel for the thing. It was basically an exercise I dreamed up one of those nights I couldn't sleep and just lay there...thinking...! Anyway, I wanted to design and build a 'Garden Shelter' (that was the term to get it by the CFO of this joint) using pretty much untrimmed, 8-foot (being the loss leader specials) lumber availabled to anyone, using only hand tools (my curse). It worked like a charm and over the first year of its life slowely morphed from the 'Teahouse of the August Moon' to 'Dad's Tiki Smoke Shack and Work Space'. If you work things slowely and properly then eventually the CFO will come up with the idea and lobby to have you take over the space. That's when you start winking and talking in kind of asides...like George Burns did when Gracie was doing some crazy thing...talking to the audience...like you had to narrate your life. Well, SOMEBODY'S gotta explain all the cool things you do that no one else notices! Well, as you can tell...life alone here in the studio can sometimes prey on one's mind...it's subtle, no running down the street wailing like a Banshee or anything. Wouldn't want to scare the cute wife of the new neighbors next door. It starts by talking to the dog. Then to some alluded to 'audience'. If you hear laughter and applause following your comments, you KNOW you're in trouble. If you just sort of pine toward the desire to have your gradually fading existance be more like 'The River Why'...or 'Zen And the Art of Motorcycle Maintenance'...or 'Sometimes a Great Notion'...or even 'Trout Fishing in America' well then, that's pretty much normal. You're just living a certain percentage of your life as a fantasy...which is quite common.

But enough of that. Today, I'll be trying to get my complainiing shoulders back into the galley, working to the beat (like Ben Hur with the big oar) and rounding the bowl shape by taking more and more of the flat planels down to the scribed lines top and bottom using the two smaller sizes of Iwasaki Carving files. Then the delicate task of rounding the shank and trying to give its lines a gracefull sweep into the body of the bowl. Then the bottom (base) will be sanded flat by taking a large cheet of medium 3-M paper (the new glues and abrasives they're using on these 3X papers are AMAZING) and laying it flat on the bench and rotating the pipe in circles...to keep it as flat an abrasion process as possible. Then I'll approach finishing the rim...whether to leave a little platteau or lop it off clean. We'll see.

Last comment...all during the process of trimming the sides down with the files yesterday I underwent periodic near heart failure as small pits would be revealed by skimming off a little stock here or there...but they have all, so far, disappeared rather quickly. The bane of pipemakers is the appearance of those damnable little pits. Tinsky's briar seems to have proven its worth...all pits have been teensy. The bottome line will be whether or not a pit appears just at the location of where a final surface should be. Two of my four past pipes were plagued by pits in areas which I wanted to be a smooth surface...two were perfect. From what I hear 50% ain't so bad. Also, it forced me to learn how to rusticate! Well, after a fashion. I guess that's a good thing.

Again, film at eleven!
 
I'ved got dead battery syndrome with my little camera - the pics have been taken. but uploading will have to wait for a trip to the store unless the 4 rechargable batteries I'm zapping up have enough oomph to complete an upload.

Anyway - more news. My wife found me prostrate and sobbing on my studio floor and after the EMT's pronounced me a big baby I regained enough strength to stagger to the house and swoon into bed. This following a trimming cut across the top of the bowl. I removed about 1/8" after carefu measuring and upon removing it was stunned that it revealed perhaps the largest pit I've ever seen. Of course, I've not seen all that many. But there, lurking below the surface of the rim was a pit that measured 3/4" long in a shape that wrapped around the curve of the bowl, and was perhaps 1/16" deep. I mean...three quarters of an INCH!?! I named it, "Carlsbad"...and promptly collapsed in a heap of jibbering, drooling madness.

Now, please don't think I'm pointing any fingers here, because I'm not. Briar is what briar is...and one thing it is...is full of pits. I think it's just dumb luck when someone gets a piece of platteau (which is the pittiest kind) that produces a pipe free of pits. But think what that pit would have been like if it have been an inch lower (successive crosscuts of the bowl eventually resulted in a clean surface) and undiscovered! What would the structure of the bowl been like, heating up that internal void again and again. It was midway between the outer and inner surfaces of the bowl and I think would have eventually (maybe years down the line) resulted in a burn-out. Maybe not. I'm not an expert. But I had no idea that a pit of that size even COULD exist. It might be some kind of record! Maybe I should have left the rim that way with the pit exposed in all its gory glory...a showpiece, in certain sick and twisted way.

Anyway, that seemingly solved (unless final sanding of the top rim exposes more beneath the surface) I went on to begin trimming the stem to its final round shape. Sanding the tenon on the stem with some fine paper (320 grit I think) allowed it to fit into the mortise pretty well and I eyeballed the line along the side of the stem to where it met the shank to check that all lines would end up straight and all. Good thing I did! I can't recommend stopping frequently to eyeball what things look like and not depending solely on your supposedly perfect measurments, highly enough. Doing this with the stem showed that the bottom line of the shank, if trimmed equally all the way down its length would result in a line that was not at all straight. So sanding just the area close to where the stem met the shank finally has resulted in what I think at this point will end up in a straight line. I left the stem in the shank during part of my sanding...but wrapped the end in electrical tape to protect it from any poorly directed sanding. It came from Mark turned, and smooth enough that a very fine paper...maybe starting at 600 grit...and if that doesn't work I'll move back to 400...ultimately ending up with a 1200 grit prior to polishing with a wheel.

I stopped at this point today so I could get some shots of the shank in an intermediate state of finish sanding. Next I'll be taking the shank down all the way to its final dimension and working on the area where it merges into the bowl.

I'll say one thing...making a regular shape...one that relies on being straight sided and all...is a significant challenge when working with hand tools. The use of machine finishing of the block, if one had something to clamp the piece in after setting up the proper angles, etc. would be MUCH easier in producing a geometrically perfect product. By hand, let's just say, it's close to impossible. Much of my time has been spent in the measuring and eyeballing needed to align averything just so. I know the human eye is credited with being able to determine difference in the 'thousandths of an inch' etc. but being able to parlay those discernments into a physical product requires great patience and skill...more of either than I possess. I guess this is why there are so many 'freehands' out there. Sort of akin to why there are so many rusticated pipes...relating to the pit problem.

I'm getting pretty close to the final stages of shaping and sanding at this point, and will wait for the batteries before starting in again. Then we'll tackle the issues of staining and finishing. Both are interesting topics with several possible directions in which to move. Stay tuned.

(by the way, I'm not proofing these things so forgive what must be some odd and perhaps amusing errors in typing)
 
Eager to see pictures of it. I admire you for your tenacity!

Bonne chance!
 
I went back out today after a good break and nearly finished the basic shape...nearly all of it. I also started to use the large and small riffling files to file excess stock at where the contour of the shank meets the bowl...it was still rough with a fair amount of wood needing to be taken down smooth. I guess most guys use a rotary tool like a fordom or dremel to that that...but without having practiced much with smaller sanding drums and my dremel...it would be WAY too easy for the drum to 'take off on its own' and skid over an area where it would scar a neighboring surface. THAT, I'm good at, having done it enough times to know how easy it is to let one little slip or lapse of concentration cause mayhem.

I have to take my son to the doctor tomorrow morning...which will take til afternoon due to the distance involved...but I'll try to get the pics posted up by evening.

At this point I can put the strummel in a pipe bag and take it with me in my pocket and put a few files in something like a pocket protector (tres nerdy) and file on it wherever I am...like waiting at the doctor's, etc. So even though I prefer to work in my shop environment...I won't have to. I've often done this in the past. If I stick a shop towel or old washcloth in my pocket I can spread it on my lap to catch the chips and dust and all and fold it up when I get up to go. Very handy.

Later gents.
 
Top