You are using an out of date browser. It may not display this or other websites correctly.
You should upgrade or use an alternative browser.
You should upgrade or use an alternative browser.
Smooth Canadian
- Thread starter mejoshee
- Start date
Help Support Brothers of Briar:
This site may earn a commission from merchant affiliate
links, including eBay, Amazon, and others.
juanmedusa
Well-known member
- Joined
- Jul 6, 2013
- Messages
- 1,535
- Reaction score
- 0
Canadian? Looks more like Virginia to me!
Hope it comes out great.
Hope it comes out great.
DrumsAndBeer
Well-known member
- Joined
- Apr 4, 2012
- Messages
- 6,603
- Reaction score
- 10
Nice!
Good luck with that one. Love those Canucks.
Good luck with that one. Love those Canucks.
I love step-by-step pics. Looking forward to the progress on this one.
Cheers,
RR
Cheers,
RR
mejoshee
Well-known member
- Joined
- May 31, 2013
- Messages
- 1,027
- Reaction score
- 1
Me too! It was requested, so I thought I'd make a teaser.Brewdude":cxmvpacv said:I love step-by-step pics. Looking forward to the progress on this one.
Cheers,
RR
I'm only a little farther ahead for reasons I'll explain in later photos. It's always a learning process; no hurdles per se, but some thought is required at every step right now for me as I train to make certain decisions by "muscle memory".
Time being what it is for me, I can't give a definite timeline for the completion of this latest project, but I at least got going and made progress last night. I have more time tonight to get to the sanding part in short order. But, as you may already know, almost half the time spent is on the stem, especially on pipes that are "straightforward" in their shaping. Fortunately I'm under no compunction to finish at a set deadline.

I'll be sure to post more on this.
- Joined
- Aug 24, 2009
- Messages
- 6,086
- Reaction score
- 41
Lol! :lol: I thought the same thing.juanmedusa":qpknr9z3 said:Canadian? Looks more like Virginia to me!
The Canadian is definitely my favorite shape, too. I look forward to seeing it as it comes along. :cheers:
huffelpuff
Well-known member
- Joined
- Dec 10, 2011
- Messages
- 3,000
- Reaction score
- 7
Looks like some pretty nice grain hiding in there. Can't wait to see more on this one.
Jim
Jim
mejoshee
Well-known member
- Joined
- May 31, 2013
- Messages
- 1,027
- Reaction score
- 1
Today's your lucky day!huffelpuff":5f99260c said:Looks like some pretty nice grain hiding in there. Can't wait to see more on this one.
Jim
Before I update though, I wanted to point out that I started this block and all the others from my Mimmo briar order by sanding all the faces on my 12" disc sander. It makes reading a block much quicker than how it comes with the really rough saw kerf or oxidation. Here's an example from earlier this year prior to doing the whole batch:
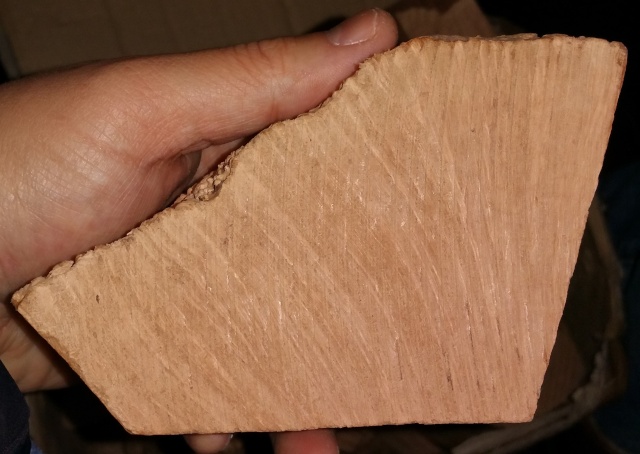
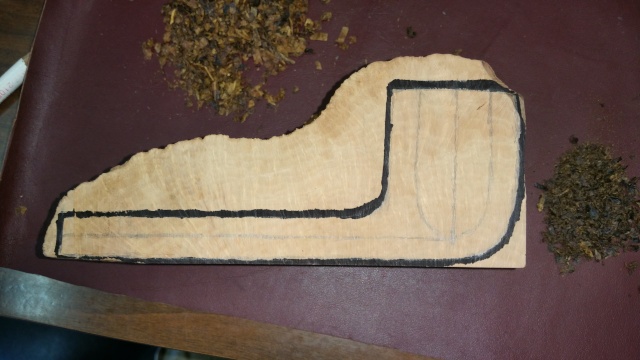
That one will make a nice calabash one day.... Ok, now continued. Here's the Canadian block waiting to be sawn:

You can see great birdseye on the shank & back (or is it front?) of the bowl! :twisted:

Now to the lathe. After drilling the airway & mortise (not shown) and a bit of turning on the shank:
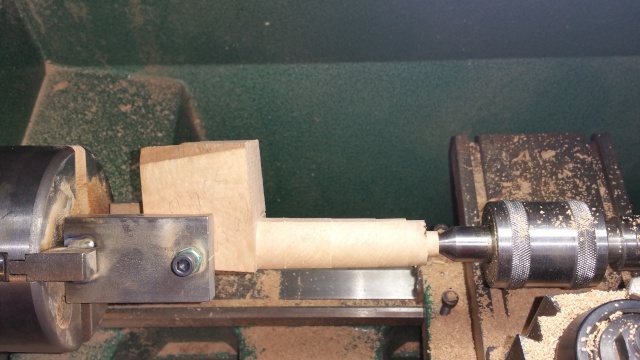
Note the tenon side is already sized to receive a 1/2" diameter shank accent. I haven't made that yet as it would require swapping the chuck to the 3-jaws, so I'll do as much as can with the 2-jaws now. Since the shank will be oblong, I still have to manually shape it later. No point in trying to take off that much material.
After even more turning of the shank and sanding down a bit, let's see how the grain is doing:
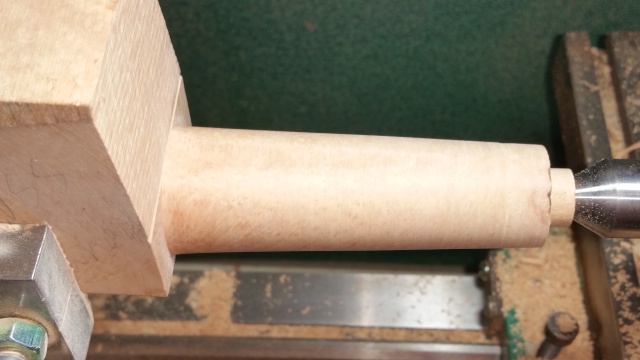
Not bad. Spritz some water on it, a la Jeff Gracik (I keep a squeeze bottle on the bench for this purpose):
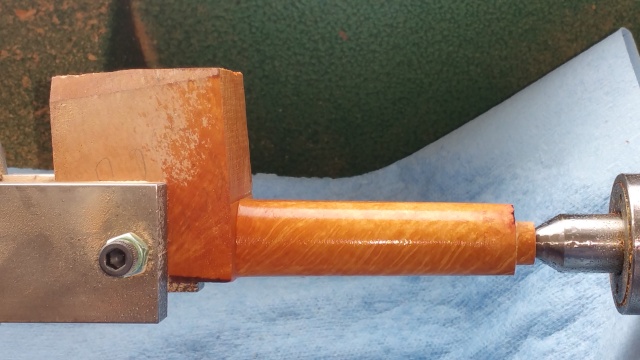
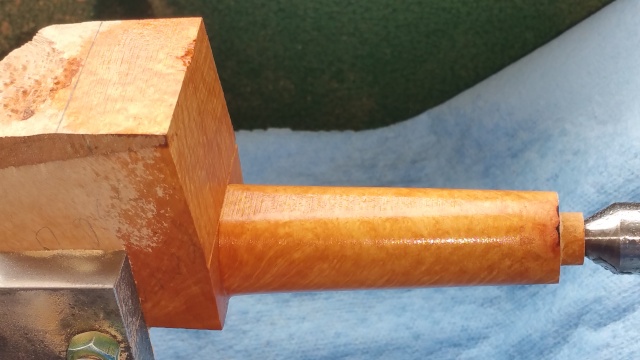
Nice grain! :face: :cheers:
At this point, a shorter shanked pipe would get rotated in the chuck to drill the tobacco chamber. However, the problem with a smaller lathe like this Grizzly is that you can't swing a large piece (8 3/4" is the spec). Which means, from center, you could really only do 4 3/8" max. This pipe exceeds 5", so it's off to the drill press in the next episode!
Good stuff Josh. Really enjoying the creation of this and the production notes.
Sure looks like you've got this well in hand.
:drunken:
Cheers,
RR
Sure looks like you've got this well in hand.
:drunken:
Cheers,
RR
juanmedusa
Well-known member
- Joined
- Jul 6, 2013
- Messages
- 1,535
- Reaction score
- 0
Love this! Will be following along.
huffelpuff
Well-known member
- Joined
- Dec 10, 2011
- Messages
- 3,000
- Reaction score
- 7
Now that's some impressive looking grain on that shank. Loving this thread!
Jim
Jim
DrumsAndBeer
Well-known member
- Joined
- Apr 4, 2012
- Messages
- 6,603
- Reaction score
- 10
Very cool Josh. I had no idea you were this deep into pipe making.
Cheers, buddy. :cheers:
Cheers, buddy. :cheers:
Briar Spirit
Well-known member
- Joined
- Aug 30, 2012
- Messages
- 2,660
- Reaction score
- 0
Coming along very nicely I see Josh, goodness I am so envious of your lathe, looking forward to seeing further progress. :sunny:
mejoshee
Well-known member
- Joined
- May 31, 2013
- Messages
- 1,027
- Reaction score
- 1
The lathe is just ok. The big deal is the 2-jaw chuck with Rudat jaws! :cheers:Briar Spirit":e0lbl2o2 said:Coming along very nicely I see Josh, goodness I am so envious of your lathe, looking forward to seeing further progress. :sunny:
mejoshee
Well-known member
- Joined
- May 31, 2013
- Messages
- 1,027
- Reaction score
- 1
A further update with more drilling. As I said, the issue with a long shank is going to be what to do when it comes time to drill the tobacco chamber. You need to make sure you drill them to meet not just vertically but also horizontally, which means you need to know where you were on-center. This is where the Rudat jaws are really helpful: You rotate the pipe in the chuck, but using the same locating pins, you get it almost exactly back to the same plane. (I say almost because the chucked item is wood and anytime you rechuck wood, it compresses a little differently in the chuck depending on how flat the faces are where they touch the jaws.)
Here is where I switched to the drill press. I lined it up in the cross-slide vise and went at it with a 7/8" silver & deming bit:
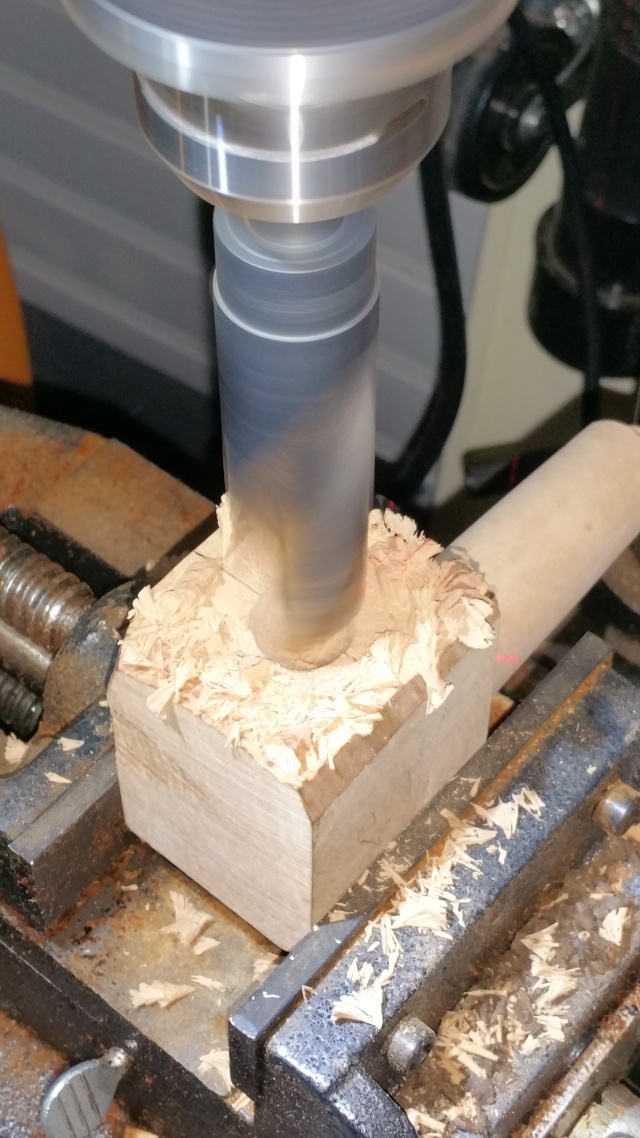
Next, I checked whether or not I hit the airway by putting a pipe cleaner in and stopping when I hit it. The drilling changes sound when the airway is found.
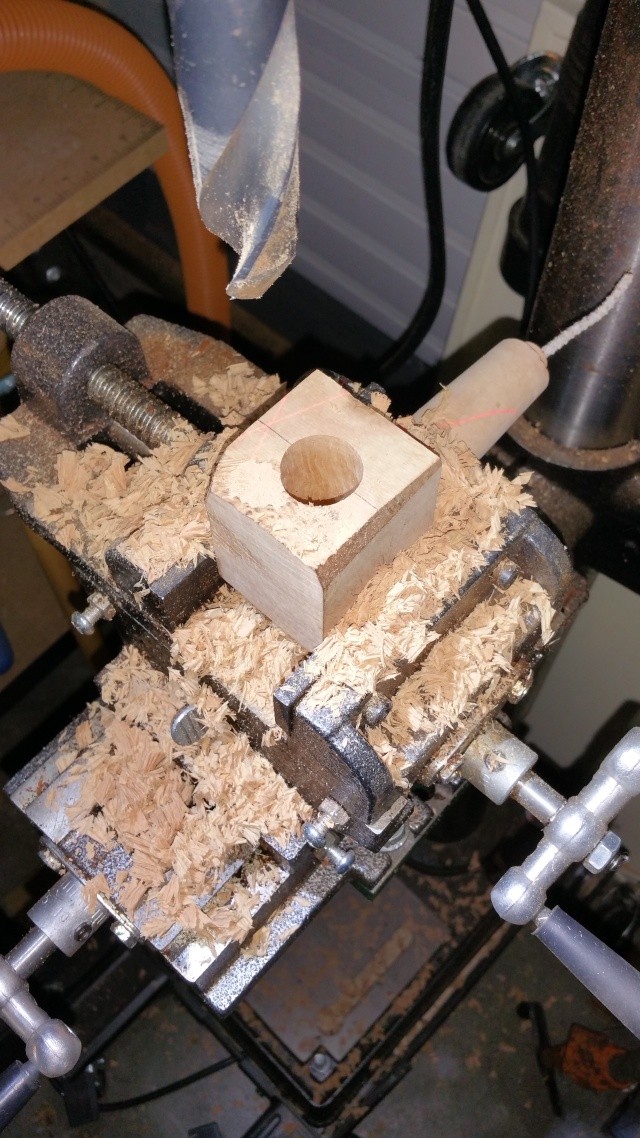

Double check we're clear (it is!) with a flashlight:
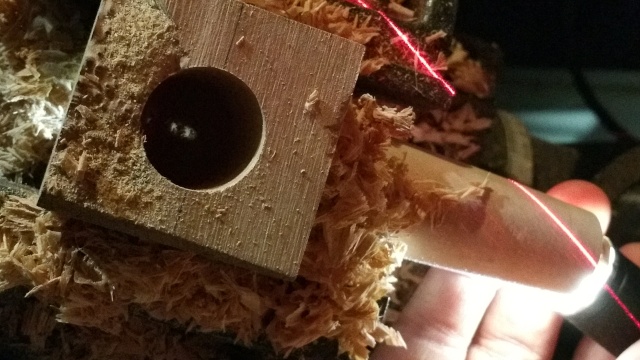
It's good, so I check again after I take it out of the vise:
Here is where I switched to the drill press. I lined it up in the cross-slide vise and went at it with a 7/8" silver & deming bit:
Next, I checked whether or not I hit the airway by putting a pipe cleaner in and stopping when I hit it. The drilling changes sound when the airway is found.
Double check we're clear (it is!) with a flashlight:
It's good, so I check again after I take it out of the vise:
mejoshee
Well-known member
- Joined
- May 31, 2013
- Messages
- 1,027
- Reaction score
- 1
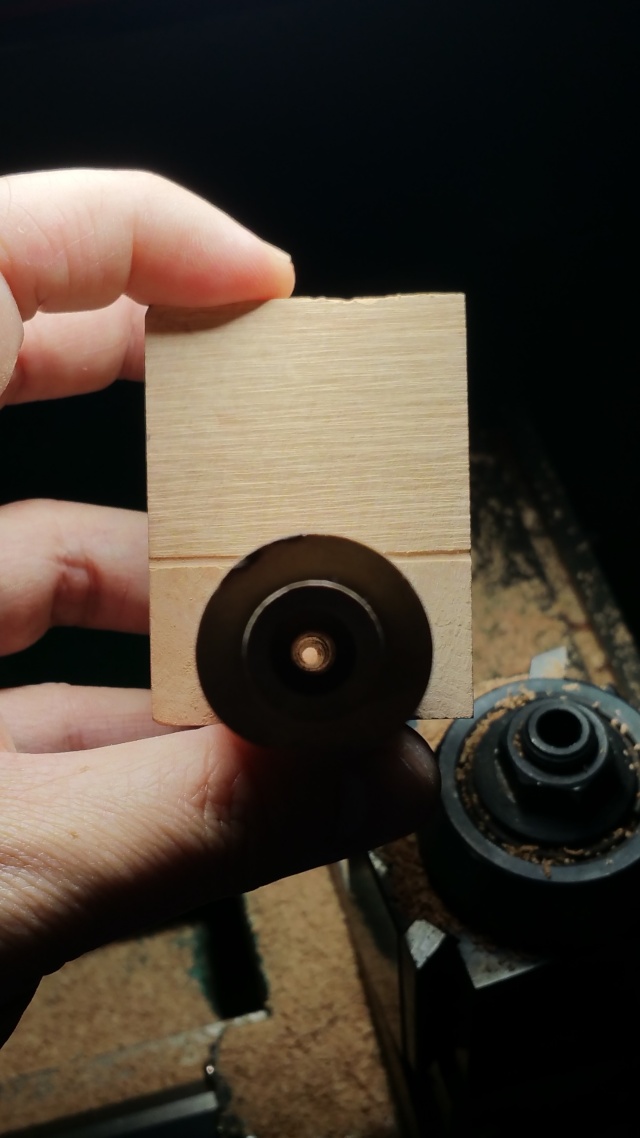
Short post on the shank accent. I was given a piece of osage orange, so I'm using that.
First I had to cut a small chunk and turn a disc, then drill it out and part it off. I didn't show all those steps but it takes about 10 minutes.
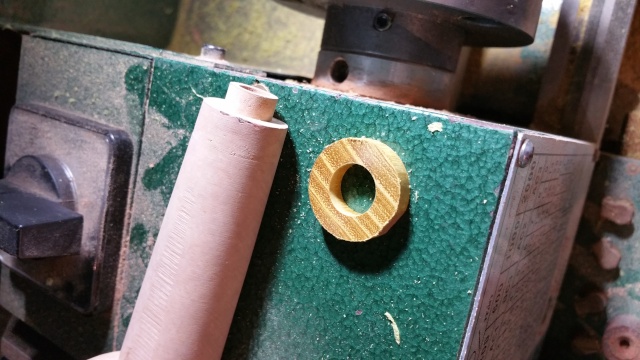
Test for fitment:
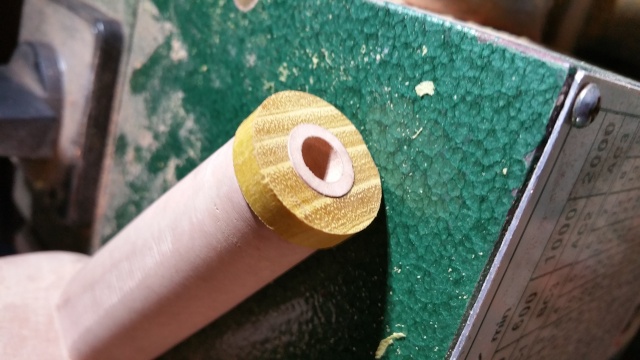
Good, now I'll apply 5 minute epoxy, then chuck the pipe back in the 2-jaw chuck and face the shank end and move on to the stem...next time!
First I had to cut a small chunk and turn a disc, then drill it out and part it off. I didn't show all those steps but it takes about 10 minutes.
Test for fitment:
Good, now I'll apply 5 minute epoxy, then chuck the pipe back in the 2-jaw chuck and face the shank end and move on to the stem...next time!
Damn Sam, you nailed that draft hole alignment 100%. What a great insight about using a pipe cleaner and listening for the drill sound to know when to stop.
Cheers,
RR
Cheers,
RR
juanmedusa
Well-known member
- Joined
- Jul 6, 2013
- Messages
- 1,535
- Reaction score
- 0
Outstanding updates. That accent wood is a tree I really like but I'm not sure I've ever seen it in a pipe or furniture. I look forward to see how that comes out.